Introduction
Hello, and welcome to the gameplay part of my Belcher Primer! If you haven’t read my previous works on maindeck and sideboard card choices, you can find them here and here, respectively. I highly recommend checking them out before diving into this article, as I covered a bunch of things in them that I will use today. Already read those? Great, let’s go then!
Belcher is an all-in, spell-based combo deck, so it’s relatively easy to play. The most skill-intensive part of the deck is not interacting with the opponent, but the familiarity with the decks limits. Learning Belcher is mostly about remembering what can and what can’t be done. I strongly recommend to goldfish a lot and (in paper or in the practice room on mtgo) go through different combo setups. The more situations you’ll learn by heart, the more brainpower you’ll save for any corner cases you might run into. There’s also an aspect of building Recross piles in time to not receive a warning for slow play – I recommend to practice building regular combo piles, so, once you’re in the tournament setting, you’ll be able to find needed cards and arrange them in a timely fashion.
Basic gameplay tips
If you don’t know what to do – go for it
Don’t try to be too tricky – your plan is extremely straightforward and you have only a couple cards that aren’t contributing to it directly. Belcher as a deck is not designed to interact with the opponent, but to cast and activate its namesake card as fast as possible. Belcher players tend to forget about it while playing with the deck and try to play around everything. Sometimes it won’t be possible – playing meaningless cards and hoping the opponent will use the Counterspell they represent is rarely a recipe for success. The longer you wait, the more likely is that the opponent will find what they need to stop you. Going for it is usually a good decision.
Friendly reminder – the manabase is shitty
Playing an all-spells strategy has a significant cost – your lands produce a single color of mana and are either tapped or require a hefty payment in order to enter the battlefield untapped. Think twice about each land drop, and pay attention to both spell and land sides of each of them.
Keep Spikefield Hazard if the opponent has relevant targets, Valakut Awakening if you expect the game to go long, and Bala Ged Recovery vs discard and counterspell decks.
Sequence your land drops well. Try to avoid taking unnecessary damage – play lands in a way you’ll be able to cast your spells without the need of playing untapped ones. In practice, just make sure to have a red source, so you’ll be able to cast Strike it Rich or Rituals on turns two or three to speed up things without the need of playing Shatterskull Smashing and losing three life for no reason.
If all lands in your opening hand enter the battlefield tapped and you don’t know if you should start with a green or red tapped source, go for the red one – there’s a chance you’ll topdeck Strike it Rich and speed up your goldfish by a full turn. The only exception is if you value the option of having Veil of Summer open higher than being faster, but that rarely happens.
Don’t be afraid to mulligan aggressively
Belcher doesn’t use that many cards to end the game on turn four (killing on turn four on the play is usually good enough in Modern and I use it as a baseline for combo decks). For instance, to achieve that you need just three lands and Recross the Paths, or three lands, Belcher, and ritual/Strike it Rich. That means that mulliganing to five or even four isn’t the end of the world. Obviously, the best scenario would be to keep sevens with more rituals for a faster goldfish time, or interaction, but having only eight win conditions in a deck without good cantrips forces us to abuse the London mulligan rule to find the pieces we need. Try to not keep a hand without Belcher or Recross and don’t be afraid to go low to find one. You’ll end up going down to five or four cards quite often, but in terms of executing the gameplan, it’s still better than keeping a hand without a win condition – without it, the deck does close to nothing.
Goldfish lines
I wrote down the most possible lines you can take to set up a win. I separate them into three sections:
Irencrag Feat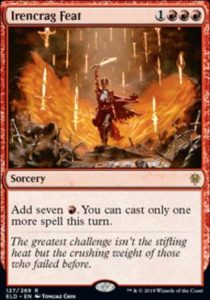
Turn 2: 2 lands, 2x rit, Feat, Belcher
Turn 3: rit, Feat, Belcher
Turn 4: 4 lands in play, including 3 Red/1 red, 1 green and Manamorphose, Feat, Belcher
The fastest way to win. They play well around Shatter effects but can be soft to countermagic (after you play Irencrag Feat, you can cast only one more spell. If it’s Belcher and they counter it, you won’t be able to protect it with Pact of Negation or Veil of Summer. As a result, you’ll lose most of your resources in exchange for one counterspell). Hard hate cards like Pithing Needle will also be hard to overcome. Going off this way without rituals can be tough because of the triple red cost on Irencrag Feat, but it can be done with the help of Manamorphose, Strike it Rich and Blood Moon effects.
Note that this goldfish line can be also achieved without Irencrag Feat. For example, splicing two Desperate Rituals can let you jump from four to seven mana. Gathering Treasures from Strike it Riches can also do the job. These ways of getting mana are usually slower than the ones that include Irencrag Feat, but they let us keep Pact of Negation open at all times.
Belcher, go (also known as Belcher pass)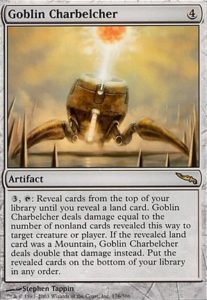
Turn 3: T2 2x rit, Belcher. T3 untapped land/rit
Turn 4: T3 rit, Belcher, T4 —
This is a turn slower but requires fewer cards – that’s why this line is quite common in heavy mulligan situations. In ‘Belcher, go’ scenarios Pact of Negation can be counted as a free Counterspell – you can counter anything they play on your or their turn and use Belcher in your upkeep, in response to the Pact trigger. There are downsides though – this is the only line of play when Shatter effects are effective against us. If you are worried about the opponent having it, consider waiting and playing Belcher a turn or two later, but with three mana open to active it.
When you are on the play and you play against a counterspell deck like Murktide, going for turn two double ritual into Belcher is a nice way to play around most of their Countermagic (basically all but Spell Pierce and Flusterstorm). I recommend doing this even if you don’t have a third land drop or another ritual ready – you’ll draw them eventually and most decks that rely on counterspells don’t have too many ways to deal with a resolved cannon, so you should prioritise resolving Belcher ASAP.
Recross the Paths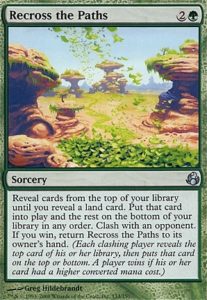
Turn 3: T2 red land, any land, rit, Manamorphose/Strike it Rich, Recross. T3 —
Turn 3: T1 Shatterskull Smashing, Strike it Rich, T2 untapped land, Recross. T3 —
Turn 4: T3 Recross. T4 —
This route tends to be slower compared to the ones with only Goblin Charbelcher involved – Recross the Paths can lead to the victory a turn after it got cast. It will never end the game on the same turn, maybe outside weird scenarios with a lot of mana in the pool and Manamorphose ready to draw a Belcher that was put at the top. The Recross kill has other upsides though – it requires the fewest amount of cards, so it’s usually what I want to see when I mulliganed heavily. The Doomsday aspect of the card gives the ability to adapt to different situations – at least as long as you know what you want to play around and you have tools in the deck to combat it. That’s why Recross shines in postboard games, where you can set up the win with the exact protection package you need.
Pro tips on how to play around commonly played hate cards
Countermagic
The easiest way to beat countermagic is to have a timely Pact of Negation on a combo turn. Veil of Summer can also do the job – it would require one more mana, but on the other hand it won’t force you to pay five mana on your next upkeep. That’s why it can be used to protect non-Belcher threats like Recross the Paths or Blood Moon. There are also ways to outplay Countermagic by just sequencing your spells correctly. The golden rule is to use your resources wisely – for example, don’t waste rituals to speed up a Belcher cast into an obvious Counterspell and instead keep making your land drops so you don’t lose too much resources should they counter your payoff. These tricks of course can be done if you are able to present more threats than they have ways to stop it. IF you have only one Belcher in hand, it’s probably correct to close your eyes, cast it when you can and hope for the best. If you have the luxury of having more than one win condition in hand, casting a game-winning card turn after turn should often be enough to break through, at least in game one. There are a few scenarios to analyse:
- Belcher spam. Just cast them turn after turn and hope that one will stick.
- Belcher + Belcher with Irencrag Feat. If you expect your first play gets countered, start with just Belcher, without a jump from four to seven mana. If it sticks, all you need to do is to untap. If not, you’ll be able to Feat + Belcher next turn and threaten the kill that will finish the game on the same turn a Belcher played on the last turn would do. Doing the sequence in the opposite way would mean that the second played Belcher would need yet another turn to finish the job.
- Recross the Paths + Belcher. Start with Recross. If it gets countered, the likelyhood of Belcher resolving next turn should be higher. If Recross resolves, check below.
- Recross the Paths is not considered a threat by everyone. Some players let it resolve and decide to focus on disrupting whatever you set up with it. This gives us an option to outplay the opponent and instead of going for the expected line (Reforge the Souls kill) you can go for spam piles with what you need the most, either Goblin Charbelchers or Pact of Negations. After the set up, you just keep casting Belchers turn after turn or wait until you gather enough Pacts to protect the game-winning cannon cast. This line of play is effective if you already have either Belcher or one or two Pacts/Veils in hand.
- In some matchups, Blood Moon effects can be considered as a threat as much as the Belcher. Casting them as bait is a common strategy vs multicolor decks like 4c Yorion piles or Living End. Sometimes they even resolve and you get a free win out of nowhere!
- Going for the end-of-turn play before the big turn is also a reasonable way to bottleneck the opponent. This tactic was the best in the Mystic Sanctuary era when Boil was a must-counter spell. Nowadays, the only meaningful spell we can play on the opponent’s end step is Valakut Awakening (and its worse version: March of Reckless Joy). It’s rarely considered a card worth being countered. It can be a powerful from time to time though, especially if we were able to set up our topdecks with Recross in earlier turns – this is a way to get fast a hand with multiple Pact of Negations, Belcher, and Rituals to cast it on time.
Discard spells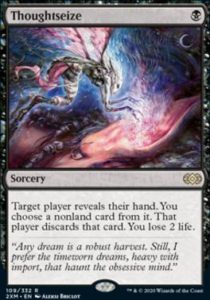
There aren’t that many useful tricks to play around discard. The best thing you can do is to topdeck well and draw what you need at the moment. Remember that some of your spell lands can help you find your wincon: Bala Ged Recovery, Valakut Awakening, and in extreme circumstances – Sea Gate Restoration (usually works only if the game is locked with Blood Moon). There are also sideboard options like Leyline of Sanctity or Veil of Summer.
Boseiju, Who Endures (and other land destruction effects)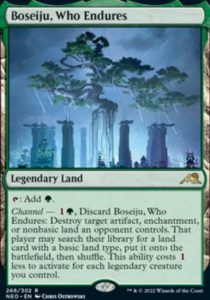
- If you can, try to cast Belcher and activate it on the same turn. Destroying a land with Boseiju is annoying, but it’s reasonably easy to rebuild. Losing Belcher after we used one or two rituals to cast it is much worse.
- Secure the mana. Strike it Rich or March of Reckless Joy looking for land drops is a fine strategy. Also, if you have only two lands in play and zero in hand, consider using Manamorphose, just exchange it for a random card. It’s better to give yourself an option to get a redraw and dig one card deeper for more lands, instead of having a dead card in hand if they stone rain you.
- Don’t try to be greedy with Recross piles. Going for the turn three Reforge win when you have only two lands in play is a recipe for disaster (if they destroy one of your lands, you won’t be able to Miracle Reforge and you’ll have no more than one land drop in the next seven draw steps). Instead, try to play a bit longer game and make land drops. While building the pile, consider that you’ll lose one land.
- Pro tip: after you set up the pile, you don’t have to search. As long as you have two lands and a way to get red mana, you should be good to go.
Ragavan, Nimble Pilferer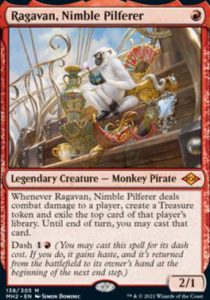
Ragavan is problematic only for Recross the Paths. The ability to steal cards from the top can ruin piles, especially if we can’t afford to win on the very next turn we went for Recross. The best way of dealing with it is to kill it before it becomes problematic. Spikefield Hazard is a clean answer. There are also other options like Shatterskull Smashing and Gut Shot or Fury out of the sideboard.
The biggest problem with Ragavan is that opponent is the one deciding wheteher they want to attack and exile our card or not. They will most likely do it, but there’s always a possibility they will decide to outlevel us and refuse to get rid of our top card. It happens rarely because it’s hard to give up two damage and a Treasure, but you’ll never know for sure. That’s why we always have to take into account that the order of the cards at the top won’t always line up perfectly with what the opponent will do.
There are many different solutions, depending on what are other risks are and which line of play we take.
- If you are going for the Reforge combo kill and there aren’t any risks involved like them attacking our mana or having a counterspell, just put two Reforges on top (if you have them) and miracle it whether they attack with Monke or not. If you have only one in the deck, put Manamorphose → Reforge, so if they attack, you go for the regular pile. If they don’t, you can set up a delayed pile with the help of Manamorphose on the opponent’s turn and win on your own.
- In case you want to go for the Reforge plan, but have other meaningful actions to take, like playing a land or Strike it Rich, you can set up removal for Ragavan at the top instead of Reforge. If they attack, they’ll bury the ‘useless’ card. If they don’t, you can untap, draw a removal, perform other actions and kill their creature while they are in combat (to avoid getting hit by a second, dashed Ragavan).
- If going for the Reforge plan is too risky and instead you want to set up a Belcher with a Pact backup, the spam pile can be more effective instead (for instance 4 Pacts if you already have Belcher in hand and want to draw protection – the exile aspect of Ragavan won’t matter in this scenario).
- In corner case scenarios when you need to draw more than just one meaningful card, you can use Manamorphose as a filler. For example, the pile when we need to naturally draw Belcher and Pact would look like this:
Manamorphose → Belcher → Manamorphose → Pact → XYZ
If they keep attacking, you’ll get what you need. If not, you’ll have the power to draw the important card and let them exile the next one, used as a filler. They’ll get to draw cards from exiled Manamorphose(s), but that’s the price you pay for the control of the drawstep.
Permanent-based hate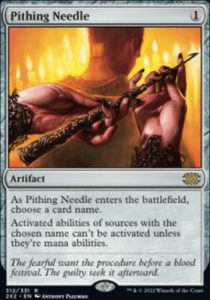
The easiest way to beat cards from this section is to build a Recross pile that will matchup well against what’s on board. Nature’s Claim deals with Leyline of Sanctity, Pithing Needle, Stony Silence, etc., and Fury can kill problematic hatebears like Meddling Mage, or Collector Ouple. Spell lands can do the job too, although they will require extra mana investment. An interesting way to beat most of the permanent-base hate is Pyromancer Ascension. While very powerful when online, it opens us to other forms of interaction that aren’t usually an issue for us, like graveyard hate. Pyromancer Ascension pile also requires you to fully commit to doing it while you set up your next turn with Recross, so if anything goes wrong (for example the opponent will draw Boseiju thanks to our Reforge the Souls), you’ll end up with a useless hand and a bunch of dead topdecks. That’s why I don’t recommend maindecking it or sideboarding it in willy-nilly. Use it when there are real reasons to add it – Karn, the Great Creator would be a good example.
That’s it for today! If you liked this text and want to learn more about Belcher, be sure to check out my other articles on it here. Until next time, take care and keep on Belchin!