Introduction
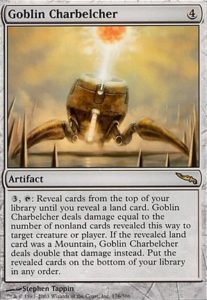
Belcher is an all-in combo deck. It combines Goblin Charbelcher and spell-lands from Zendikar Rising. As a result, we technically don’t play any lands at all and Belcher is a one-card combo kill – all you need to do is to cast it and use its ability, and it will deal damage equal to the size of your library to any target.
History
Goblin Charbelcher has been a combo finisher on and off for years at this point. Back in the day, there were two ways of using it – either you exiled all lands from the deck with cards likeMyr Incubator or Mana Severance, or you built your deck in a much more glass cannon-y style – playing very few or even zero lands, and focusing only on activating Belcher ASAP. This strategy was often used back in the early days of Legacy when there was only Force of Will to stop these types of all-in combo decks. Nowadays Belcher is pushed out from the Legacy metagame, mostly because there are other, more efficient ways to kill on turn one (for instance Oops). In Modern, Belcher has struggled for years – at the very beginning of the format, when Rite of Flame was still legal, people were trying out a version with five Mountains, but the deck was just than other available combo decks, namely Storm. Another quite popular take was to combine Goblin Charbelcher with Forests and a lot of tutors for basic lands, but it wasn’t even close to top tier though. All has changed with the release of Zendikar Rising and the MDFCs.
The flip land mechanic was the missing piece for Belcher. For the first time, the deck could play something even remotely close to the regular game of Magic, and not lose its one-card combo kill potential. At first, it wasn’t considered a really good deck, but the lists started to get more and more refined, and at its final stage it was one of the best combo decks in the format – the combination of resilience and fast combo kills is always scary to play against. Everything collapsed after the Simian Spirit Guide ban. For quite some time no one ever tried to rebuild the deck, but eventually good enough replacements were found. It’s also quite interesting that there was a rahter long period when the deck wasn’t played not for its lack of power, but thanks to MTGO bug that broke Recross the Paths, so we couldn’t build piles. Once Wizards fixed it, Belcher started to see more and more play, aided by a bunch of Modern Horizons 2 additions.
Belcher after Simian Spirit Guide ban
If you were playing Belcher in SSG times, you probably wonder what has changed since the ban. The answer might be surprising – not that much actually. The core of the deck is still the same, and the ‘only’ challenge was to find a Recross pile that would guarantee a combo win from 0 mana available after Reforge the Souls resolves. Luckily for us, it’s still doable. At first Infernal Plunge + Pact of the Titan was a way to generate mana from one land we can play for a turn. Right now, the most often used engine is An Offer You Can’t Refuse + a free spell (more on that later). And once the first two mana is generated, it’s trivial from there: a pile of Rituals and Inrencrag Feat will do the rest. A typical pile for the Reforge kill from two lands:
Turntimber Symbiosis → Reforge: Sea Gate Restoration, AOUCR, free spell, 2x Ritual, Irencrag Feat, Belcher
As a result, we have the same amount of mana from seven cards as we’ve had before. You play a land, cast a free spell, hold priority, so you can counter it with An Offer You Can’t Refuse, and do the rest like always. The combo route without SSG won’t be worse in goldfishing but can matter vs Eidolon of the Great Revel, Tax effects, etc., but overall the deck’s feeling is very similar to what we all know from before bannings.
Belcher – Analysis card by card
Rituals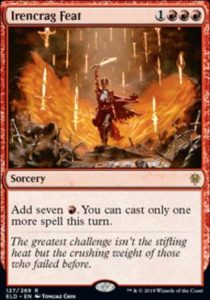
Casting our main win condition and activating it is the only real plan the deck has. But seven mana is a lot, so Belcher uses many forms of mana acceleration to speed up its goldfish.
Pyretic Ritual and Desperate Ritual
They speed up both Belcher and Blood Moon cast, and are also important part of getting triple red to cast Irencrag Feat.
Remember that Splice into Arcane matters. If you happen to draw two Deseprates, it’s an elegant way to jump from four to seven mana, which is exactly how much we need for the kill. Unlike Irancrag Feat, this four to seven jump won’t stop us from casting other spells, like Pact of Negation to protect Belcher. It’s also a key element in the Ascension loop.
Nearly all turn two and turn three wins are doable thanks to this card. It’s drawback is real though and it makes it a liability vs countermagic because if you go Feat → Belcher and they counter, you can’t protect it with Pact of Negation or cast anything else as a follow-up. The only upside is that once you produced 7 mana, you can cast Belcher and pay extra the mana if the opponent has Metallic Rebuke or Spell Pierce, so in some cases, you can try to bait out their soft countermagic with Feat and still keep Belcher in hand for future turns.
A new card from Modern Horizons 2. In this deck, it does two things: trades a card from hand for an extra mana on a combo turn and enables green mana for Recross the Paths and Veil of Summer. What’s very important is that it can filter green after a ritual cast, so it increases the amount of turn two Recross into turn three win significantly (T2 Ritual + Strike into Recross, T3 Reforge kill). The flashback part is also quite relevant in slower match ups where you can afford to slowroll your Belcher – getting two mana off one card means reaching seven mana to cast and activating Belcher is quite doable. By doing this, you can play around Shatter effects waiting for our Goblin Charbelcher (cast and activate on the same turn instead of cast and pass the turn, giving the opponent a window to use one of their Shatters). They can still use their interaction to get rid of your Treasures to keep you off enough mana to combo off, but you’ll draw into it eventually and they’ll be down a card on the trade. Overall it’s probably the worst card in the deck given the aforementioned fragility of Treasures, but it’s still good enough.
The combo
The heart of the deck. It’s your main and very often only win condition.
#1 After you activate Belcher, you can stack your library. Sometimes relevant when they have more life than you have cards in the deck or something like Spellskite to redirect the damage. But remember that it’s not the same as Recross! You won’t have a Clash effect, so put the card you want to draw right away, not a Turmtimber Symbiosis just to put it at the bottom of the library.
#2 Timing of the shot might be important. If you go for the ‘Belcher-go’ line and the opponent lets you untap with it, you don’t have to use it on your turn. I like waiting till the opponent’s upkeep, so if they have a response, they have to use their mana on their turn and will have less resources during my next attempt to combo.
#3 Similar situations come up with Pact of Negation trigger. If you have Belcher on the stack/in play, you can counter whatever you want for 0 mana, and later in your upkeep, respond to the Pact trigger when it’s on the stack and activate the cannon. This will end the game before you lose to your own Pact.
#4 If you have a Mountain in the deck, remember about doubling the damage!
#5 One small downside of winning with Belcher is that we’ll show the whole library to the opponent, so they’ll have perfect info about our deck. Luckily, winning the game is a rather fair consolation price.
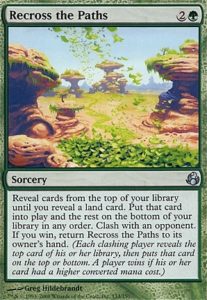
The actual effect of this card is irrelevant – we don’t have any lands in the deck. What matters is that it lets you put all your cards to the bottom of the library in any order. As a result, you can stack your library however you want. It serves as more copies of Belcher, as well as a tutor for reactive cards if you need them. It’s easily the most skill-intensive card in the deck – if you want to play Belcher well, I strongly recommend learning the most key piles and generally speaking having a strong background on Recross the Paths theory. Once you start playing it, you’ll quickly realize that it’s Modern Doomsday.
#1 If you decide to side in real land for whatever reason, Recros won’t work like it ‘should’. It will not let us stack the library, but it will find our land and put in into play, just like it’s written on the card.
#2 Clash on the card matters. Winning it means one more card in hand (useful when we are going for Valakut Awakening piles, need a card to pitch to Force of Vigor, or vs discard effects like Kroxa, Titan of Death’s Hunger / Liliana of the Veil), an option to stack the deck again if something goes wrong (for example if the opponent forces us to shuffle the library with Field of Ruin, or when our reactive pile doesn’t match up well with what the opponent does). It’s also useful for the opponent since it’s a free Scry.
Cards for Recross the Paths piles
Most often a necessary evil, they are here to be able to build a Recross combo piles. We don’t want to draw them, but we need to have them in the deck to be able to kill fast.

A key piece for Recross combo piles, but sometimes you’ll be unlucky enough and you’ll happen to draw it naturally. If the game goes long, maybe you’ll be able to put it back in the deck with the help of Valakut Awakening. When I started playing Belcher, I thought that drawing Reforge is an instant game over, but the more I played, the less I was needing it to win. Still, it’s nice to have access to combo kills but watch out for the opponent drawing a fresh seven. When you go for the Reforge kill, make sure you’ll have the right pile to deal with their hate cards.
How many copies you should play? There was a time when playing two maindeck was correct, mostly because of Ragavan, Nimble Pilferer’s ability to steal top cards. With two copies we could build a regular pile with two Reforges at the top and win the next turn no matter if they attack or not. This has changed with the switch from Infernal Plunge + Pact of the Titan to An Offer You Can’t Refuse and a free spell, because the new engine needs all seven cards to go off from two lands in play. As a result, in this scenario, a double Reforge vs Ragavan does not guarantee a win anymore, because if they don’t attack we miracle Reforge, and draw Reforge + six out of seven cards required to finish the game. There’s also another factor – basically every Ragavan deck at the moment also plays countermagic, so going for the turn three combo kill is rarely effective. It’s better to slow down a bit and prepare a pile that will not fold to one Counterspell. That’s why I believe that playing two Reforges is unnecessary and having only one and a free slot for an interactive spell in a process is the way to go.
#1 Remember that you are not forced to reveal the card or to use Miracle at all. If you draw it naturally and your hand isn’t total garbage, you can accept that this happens and move on. Sometimes your combo pile will be neutralized by the opponent, for example when they attack your only red mana source. In that case, just draw your Reforge and try to find the win in future turns. Failing to Miracle is far from game over!
#2 Note that you can respond to the Miracle trigger. For instance, you can cast Rituals from hand, so after Reforge resolves you can Manamorphose into Nature’s Claim to get rid of opponent’s hate card. This line lets you not waste resources to answer stuff in your main phase, and means that you’ll have more mana in the combo turn.
#3 Miracle won’t work with Teferi, Time Raveler due to its static ability. If there’s a chance the opponent will have it, consider building a Recross pile that won’t use Reforge at all.
An Offer You Can’t Refuse + a free spell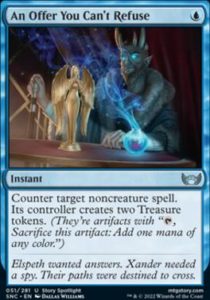
This is your way to jump from one to two mana, which is needed to cast Rituals into Feat + Belcher in combo piles, which is a necessary evil that enables a turn three wins using Recross the Paths. No matter what you play in these slots, they will be the worst cards in the deck. This package is sideboarded out in basically every match up when going for a turn two Recross into turn three Reforge the Souls carries a high risk, and going for slower piles with protection is a better alternative.
But what two card package we should play? Why currently played one is better than an old Infernal Plunge + Pact of the Titan? Because it’s nice to not draw blanks in setup turns. Belcher does not have many ways to generate a card advantage, so every draw step counts. Having a card with useful text cannot be overestimated, even if it won’t be used very often. It is fairly easy to imagine the situation when one mana Negate can win out of nowhere. It’s harder to think about the potential upside of a free spell. In my opinion, there are two that can be considered playable:
Noxious Revival – most of the time, I would choose this one. It often acts as a redraw of a card that the opponent got rid of and we would like to use it again. The most common is putting at the top a Belcher or Recross that got countered or discarded. I also had situations when I was targeting my land that was destroyed by Boseiju. From time to time it can also act as an interactive spell – it fizzles cards like Persist, Snapcaster Mage, or prevents Undying creatures from returning to the battlefield. Noxious Revival can also act as a combo piece in Pyromancer Ascension loops.
Gut Shot – it’s another reasonable option. I value it higher than Noxious Revival when there are enough X/1 creatures I can kill with it. Most often it narrows down to the question: how many Ragavans do I expect to see? If more than average, going for Gut Shot can be a good metacall.
While both presented Phyrexian spells have a text that can affect the game, they also have one huge downside. They force us to lose two more life compared to alternatives. If we also count that we have to play two lands untapped in a process (on turns two and three), we’re looking at eight points of self-inflicted damage. That won’t be too much of a problem on the play, but on a draw some of the more aggressive decks can kill us from this position.
Infernal Plunge and Pact of the Titan
Before AOYCR was printed, this was the go-to option for Belcher players to win on turn three using Recross. It’s worse because both cards do close to nothing when drawn naturally, but I believe that there are some metagames when choosing this engine can be a good decision. For instance: if we expect to play against a lot of Burn players, going for Plunge + Titan can be more effective because we’ll lose two less life during the combo (no need to pay two life for a Phyrexian spell).
#1 If you draw Pact of the Titan before Recross, you can set up a pile and cast it on upkeep, before Reforge miracle. If that’s necessary, you can add one more card to the pile – you’ll get access to an extra Pact of Negation, one more mana or whatever else you might need.
#2 You can cast Pact of the Titan as a surprise blocker.
#3 Infernal Plunge can be put back to the library with Valakut Awakening.
Others
It does a lot of small things. It:
- Smooths out our bad mana. The most common is converting mana from red and green lands into triple red for Irencrag. You can also cast Morphose from only green lands, so it enables casting Rituals/Strike it Rich. Sometimes, you’ll be able to pay for the Pact of Negation with it.
- It’s a way to cast turn two Recross the Paths to set up turn three combo kill: T2 Ritual + Manamorphose → Recross. Next turn Reforge into a combo pile.
- Enables the delayed pile with Reforge (you put Manamorphose and then Reforge the Souls. Draw a Morphsoe for a turn, pass. At opponent’s endstep, cast Morphose to trigger Miracle and you’ll end up with two more untapped lands and an extra card drawn for the turn). Useful when you want to bait the counter on opponent’s endstep, or when you need a lot of cards and mana to deal with opponent’s things.
- To some extent, it can protect our Recross piles if the opponent has ways to mill the top of our library (Ragavan, Thought Scour, Shriekhorn, etc.) Just put a few Manamorphsoes and Belcher after that. opponent will mill our free redraws and you’ll draw a kill spell. And if they don’t draw their mill action, you can just cast your redraw spells and find your key card.
- If you go for the Recross control pile, it acts as a Time Walk (extra draw in addition to draw step every turn, useful when you stack Belcher and multiple U Pacts).
- It’s essential for Pyromancer Ascension loops.
A free countermagic on combo turns. Kind of irrelevant in any other situation, but it’s still worth having in a format with Counterspell, Force of Negation, etc. The most common line for it is Belcher → Pact an opponent’s counter/Pact on a relevant spell the opponent can play on their turn → Belcher activate on upkeep, in response to U Pact trigger – quite similar to Ad Nauseam tricks if you are familiar with the strategy. Pact of Negation is also a relevant card in Recross the Paths piles – if you have more than two lands in play, it’s usually possible to create a pile without Irencrag Feat, so the Pact can be used to protect Goblin Charbelcher on the stack.
#1 Sometimes you’ll be able to pay for the Pact, thanks to Manamorphose and Sea Gate Restoration.
#2 Using Pact of Negation should be your last line of defense. Once you go for it, there’s no coming back and if the opponent has more responses than you have pacts, you’ll lose in your upkeep, which is why I recommend using it wisely. For instance, if you have three Belchers and one Pact of Negation in hand vs UW control that can have multiple Counterspells, Teferi, etc. maybe it’s correct to let them counter the first and second Belcher and fight for the third one.
Moon lost a lot of its potential after the Boseiju, Who Endures print, but it’s still a viable option in certain metagames. It doesn’t do anything for the combo plan, but it can enable fast wins too – once the opponent can’t play any spells, it’s trivial to finish the game eventually. It’s considered as a maindeckable option in a deck more as a result of being good with rituals than because of its raw power or being useful for the engine. Sometimes you’ll be able to win on turn two after you go: rit → Moon. Sometimes it won’t do much because the opponent got enough basics or their spells are mostly red. Remember one thing – Belcher does not need to lock anyone with the Blood Moon effect. In this deck, it’s more of a must-counter threat that will slow the opponent’s development, so you’ll have time to deploy a game-winning Belcher. For instance, vs UW Control, Blood Moon can win the game alone from time to time, but it’s more often used to not let them have 5 blue sources, so they won’t be able to Counterspell + Archmage’s Charm. Once they can’t play mutliple counterspells, Belcher + one U Pact is usually enough to win. Still, remember that the effect is not an auto-include. If you don’t feel it will be good in the given meta, you can play it in the sideboard, or even without it at all – the deck will still do its thing.
#1 With Moon in play, all your lands will enter the battlefield untapped and without the need to pay three life. Can be relevant vs faster decks.
#2 Converting all lands into Mountains will sometimes help you cast Irencrag Feat or Splice Desperate Rituals.
#3 Watch out to not cut yourself off of green when you want to go for Recross piles. Manamorphose and Strike it Rich are here to help you through.
Another card that’s not essential for the combo and you can easily play without it in your 75. My rule of thumb is if Blood Moon is not well-positioned, I tend to play one or two copies of March, just to increase the consistency. It gets cut after the sideboard relatively often. March of Reckless Joy is a typical, flexible support card that can be used in different modes.
- Its main purpose is to ensure we get our land drops. With March in the opening, keeping a one-lander with a red source is more justifiable.
- If our mana is secured, it can also be used to dig for our win conditions. Useful when the opponent has discard or countermagic and we rely on good topdecks, especially if we cast this on opponent’s endstep, so we can set up a window to resolve our key spells on our turn.
- March of Reckless Joy can be also used as a Recross pile element. It can be narrowed down to: ‘R: draw two cards’, you just need to have another red card to exile. When we know exactly what we have at the top, this effect is extremely powerful and it lets us create game-winning combo piles without using Reforge.
A great addition from Modern Horizons 2. In a deck where lands have colors and you can combo out on turn three using five cards from hand, it can be counted as a free removal spell. Still, it doesn’t contribute too much to the combo kills, maybe outside killing Karn, the Great Creator from time to time. I value it more as a sideboard card vs tribal decks and Burn. Sometimes, if your local metagame is infested with creature strategies, it can be worth adding it to the main.
Our alternate win-con when Goblin Charbelcher isn’t good enough. Sometimes it’s played in the main, sometimes in the sideboard. I’m closer to the second approach since in game one Belcher will rarely be stopped anyway (the only exceptions are Karn, the Great Creator, and its static ability and Pithing Needle in some artifact decks with Urza’s Saga). However, post sideboard it’s a very effective tool against all aforementioned effects, as well as cards like Nacromentia, Leyline of Sanctity, or anything you can think of. Who would have expected that infinite mana and draws give a lot of options?
From time to time you can see lists with a single copy of Empty the Warrens in it. The idea of the card is to be a surprise win condition after we Reforge into a Belcher pile and the opponent is waiting with their countermagic to deal with the goblin cannon. So instead, we pack a bunch of rituals, Manamorphoses, and ETW, so our finisher can’t be countered by a single spell. Sure, it can catch the opponent by surprise from time to time, but in reality, players usually counter Reforge the Souls to not let us draw a perfect seven. Also note that once we draw the nuts, it will most likely be a pile with Belcher and Pact of Negation, so there’s no need to rely on goblin tokens. Especially when so many drawbacks of this plan – Empty the Warrens pile can’t be protected with Pact of Negation because goblins don’t have haste, so we’ll lose to the pact trigger(s) on our upkeep and horde of goblins will just lose to random things like flyers, lethal Lightning Bolts, opponents’ combo kills, etc. from time to time. Personally, I would avoid playing the card in Belcher, as the alternatives are just better.
The manabase
Lands in All Spells decks will be bad almost by definition – there are no MDFC duals, and most of the lands enter the battlefield tapped, but it’s a price to pay for one card combo kills. At least Belcher uses the ‘spell’ part of them much better than other All Spells strats do. Obviously, I would love to play a regular manabase, but we don’t have any alternative and we most likely won’t get any in the foreseeable future, so the only thing left to do is focusing on how to use the advantages and how to negate their drawbacks.
#1 Remember that your lands can be discarded, so especially against black decks think about sequencing in order not to lose access to needed color. Also, cmc can matter because of the Inquisition of Kozilek.
#2 Don’t just play your lands mindlessly against slower decks. Later in the game, they can be looted away with Valakut Awakening.

It can kill annoying creatures. When you get to X = 6 or more (usually when combined with Irencrag Feat) you can kill the opponent’s clock to buy more time to topdeck the win. It’s also a very expensive way to deal with Teferi, Time Raveler, and Karn, the Great Creator, but it’s quite hard to set up.
Mass looting effect helps to find combo pieces or protection. Very useful in slower match ups like control or slow midrange. You can build Recross piles based on drawing Valakut Awakening instead of Reforge the Souls (for instance when Teferi, Time Raveler is on the battlefield) and cast it on your turn or at the end of opponent’s turn to draw cards you’ve prepared. Basically, it’s a slower Reforge, but the opponent won’t draw a new 7.
It kills Ragavan, Dragon’s Rage Channeler, mana dorks, and Inkmoth Nexus. From time to time you can also catch hate bears like Thalia, Guardian of Thabern or Phyrexian Revoker. Sometimes you can even catch Teferi after they minus it. Note that the permanent that was dealt damage this day would die, it will get exiled instead. So for example, you can ping a Kroxa in response to the discard trigger, so it will never go to the graveyard and the Escape won’t threaten you. It’s one of the possible win-cons in the Pyromancer Ascension loop.
It’s here mainly as yet another red source. It’s not an Akroum Warrior, because it can be useful in Pyromancer Ascension loops to create infinite hasty 4/4s (cast many Pact of the Titans/Emeria’s Calls and take control over them, they also get haste in the process). If your deck doesn’t have an option for creating a horde of Angels or Giants, you can play the Warrior instead.
Can return to hand discarded/countered card. In extreme situations, it can be useful if you have only one anti-hate card for Recross piles but opponent presented two hate pieces. The most common is double Leyline of Sanctity vs one Nature’s Claim in the deck. Sure, it’s slow, but can work from time to time. Bala Ged Recovery is also essential in the Ascension loops.
In this deck, it’s just land. Technically you can cast it, so you can find a Magus of the Moon, but I haven’t done it yet and I can bet neither have you.
Sea Gate Restoration vs Emeria’s Call
All Spells manabase is quite shitty and we are forced to play off-color untapped land to keep up with the tempo. There was a discussion about which one should be played – in the SSG era, when Assassin’s Trophy was played in Belcher’s sideboard, Agadeem’s Awakening was the choice, but nowadays it’s a discussion between Sea Gate Restoration and Emeria’s Call. 98% of the time, they will both do the same – add ‘colorless’ mana to the pool. The difference is in details: Emeria’s Call can be used in Ascension loops as a way to create infinite 4/4 Angels, while Sea Gate Restoration is another way to pay for Pact of Negation and in one out of a thousand matches, you’ll be able to hardcast it to find a Belcher. Splitting them is the correct way to build the deck. The question is if it should be 2/2 or 3/1. All comes down to what’s more likely – paying for a Pact of Negation or decreasing the chances to play Emeria’s Call as a land in the early game when you could need Angels as a win-con. From my experience, paying 3UU in upkeep happens more often.