If you are new here, don’t forget to check our Discord Channel. it’s free for everyone!
If you are looking for more Yawgmoth content, including the sideboard guide, click here.
A typical list
If you can’t see the link or want a downloadable version, click here.
Basics
What is Yawgmoth?
Yawgmoth is Modern’s premier creature-based combo deck. The deck resembles the playstyle of Melira Pod from years ago, seamlessly switching between winning with a quick combo finish or slowly outgrinding opponents with a potent midrange plan. This deck gets its name from Yawgmoth, Thran Physician, a powerful creature from the first Modern Horizons set. Yawgmoth generates card advantage, kills opposing creatures and is the integral part of the deck’s game-ending combo. Yawgmoth runs a green tutor package to find the namesake card or search for whatever creature is best suited for the situation. Personally, I have found Yawgmoth to be one of the most rewarding decks to play in Modern. Each game has multiple relevant decisions and most games feel winnable if you can navigate towards the best lines. This primer is a deep dive into the card selection and gameplay of Yawgmoth, designed to help improve your game or convince you to pick up Yawgmoth for the first time.
Why is it good? What is the best metagame for this deck?
Yawgmoth has been a strong deck in Modern since the format realignment post MH2. Its success comes primarily from the ability to switch between fast combo and midrange beatdown gameplans. However, due to its reputation as a difficult deck to pilot, Yawgmoth has historically been underrepresented. This has all changed since the printing of LotR and WOE. Yawgmoth received multiple crucial upgrades and is now firmly entrenched in the top Tier of Modern. Currently, Yawgmoth is one of the most popular decks on Mtggoldfish. Since WOE, many experienced Yawgmoth pilots have been posting over seventy percent win rates with the deck. Yawgmoth has very few truly terrible matchups; even your worst pairings are likely close to forty percent and feel winnable with tight play and a little bit of luck. Here is a brief overview of Yawgmoth’s good to even matchups:
- Yawgmoth’s best matchups are against other creature decks such as Hammer, Hardened Scales, Merflok, or any other creature-based strategy that plays little removal. When left uncontested, Yawgmoth, Thran Physician dominates the battlefield and generates enough card advantage to close out the game. This same pattern holds true for some of the more fringe decks like Humans, Goblins, Infect, Heliod, and Asmo-based Food decks you may run into at your local tournaments
- Yawgmoth also excels against counterspell-based control decks. Delighted Halfling, one of the biggest upgrades from LotR, makes all of your premier threats uncounterable and often requires an immediate answer. The chip damage from Young Wolf, Insect tokens, and the other small creatures forces the control player to react, opening a window to resolve a powerful spell. Additionally, Yawgmoth deploys threats such as Orcish Bowmasters, Endurance, and Chord of Calling at instant speed, which makes it difficult for the control player to counter all of the threats
- Prior to Wilds of Eldraine, Yawgmoth was roughly even against the different flavours of Ragavan-based midrange decks (Murktide, Scam, Jund, and Shadow). These matchups were often extremely grindy and heavily rewarded player skill and experience. However, the printing of Agatha’s Soul Cauldron has given Yawgmoth a cheap, effective, and difficult to answer card to easily outgrind these midrange decks. post-WOE I consider all of these matchups to be favourable for Yawgmoth
- The matchups against most big mana and linear combo decks (Tron, Titan, Storm, Breach, etc.) are relatively even and heavily favour the player who is on the play. Yawgmoth typically runs sideboard cards for these matchups in order to have better chances of stealing games on the draw
What are the deck’s biggest weaknesses?
Even though Yawgmoth is one of the best decks in Modern, it is not without weakness. Here are some of the places Yawgmoth struggles:
- Linear spell-based combo decks like Belcher, Calibrated Blast, or Neoform will often outrace Yawgmoth. Outside of a few sideboard cards, Yawg is unable to meaningfully interact with this style of deck. Fortunately, Scam and Murktide help keep the presence of spell-based combo decks low
- Rhinos, both Temur and Domain, are Yawgmoth’s most challenging matchups, at least in terms of popular decks. Crashing Footfalls presents a sizable clock that quickly pressures Yawgmoth’s life total while the free interaction from Subtlety, Force of Negation, and Fury prevent Yawgmoth from amassing enough creatures to stabilise the battlefield. Most Yawgmoth lists have 2-4 dedicated hate cards in the SB to help improve this matchup
- Ephemerate, when combined with either Fury or Solitude, is nearly impossible to beat. Unlike Scam’s undying effects, which can be turned off by Agatha’s Soul Cauldron, Ephemerate skips the graveyard completely while still doubling up on the ETB triggers of these pitch elementals. Ephemerate also works as a pseudo Time Walk, where the threat of Rebound prevents Yawgmoth from playing more creatures on their next turn. Fortunately, Four Colour has shifted away from Ephemerate recently in order to lean more heavily on Up the Beanstalk
- Yawgmoth can struggle with dedicated hate cards out of the sideboard. Previously, Yawgmoth was not enough of a threat to justify anything more than Leyline of the Void or Pithing Needle, which are both relatively easy to answer. Now that Yawgmoth is firmly entrenched as a Tier 1 deck, players are starting to sideboard dedicated hate cards like Grafdigger’s Cage, Cursed Totem, or Damping Matrix. These cards not only turn off Yawgmoth’s key engines, but also impact the deck’s ability to find an answer
Maindeck – analysis card by card
Payoffs
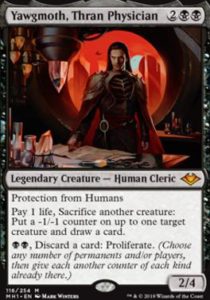
Yawgmoth, Thran Physician is the namesake and most vital card in the deck. Yawgmoth is a 2/4 legendary Human Cleric for 2BB, perfectly sized to survive a Lightning Bolt. Yawgmoth’s first ability, “Protection from Humans” is just added flavour text in most matchups. However, there are still a few scenarios in Modern where this ability is relevant:
- Yawgmoth can block Shardless Agent, Mutavault, Esper Sentinel, Puresteel Paladin, Soul-Scar Mage, Monastery Swiftspear, and sometimes even Dragon’s Rage Channeler without fear of dying to a Colossus Hammer or damage-based removal. It is important to note that both Stomp out of Rhinos and Skullcrack out of Burn negate the damage prevention, so it is sometimes correct not to take the “free” block on these creatures
- Asmoranomardicadaistinaculdacar is a Human and is unable to target Yawgmoth. Even if Asmo’s ability is transferred to a non-human creature with Agatha’s Soul Cauldron, Yawgmoth still does not take damage from this ability since he’s a Human himself
- In the mirror match, your Yawgmoth can’t target your opponent’s Yawgmoth and vice versa. This leaves Grist, the Hunger Tide, Yawgmoth under Agatha’s Soul Cauldron, and any post Sideboard removal as the only answers to an opposing Yawgmoth
Yawgmoth, Thran Physician’s true power comes from his second ability, and the deck is constructed to maximise this ability’s potential. At the cost of one life and sacrificing a creature, Yawgmoth can put a -1/-1 counter on up to one target creature. The ideal creatures to sacrifice to this ability are Young Wolf and Strangleroot Geist. Both of these creatures have Undying and come back with a +1/+1 counter as long as they didn’t have a +1/+1 counter when they died. If you sacrifice another creature, you can put a -1/-1 counter on the Undying creature, cancelling out the +1/+1 counter and “resetting” the undying creature. With one undying creature, you can draw two cards for each creature sacrificed, essentially mimicking Skullclamp. The real fun begins when you have two undying creatures; you can sacrifice an undying creature to reset the other, resulting in a modern legal Yawgmoth’s Bargain. From there you can bury your opponent in card advantage or set up a combo kill with Blood Artist/Zulaport Cutthroat, which is discussed in detail later. It is important to note that if the creature you target with Yawgmoth’s second ability is removed before the ability resolves, you do not draw a card. For this reason, it is sometimes best to choose no targets even if there are creatures on the battlefield.
Yawgmoth’s third ability is often underutilised among newer Yawgmoth pilots, but can be extremely powerful, especially in conjunction with Agatha’s Soul Cauldron. For the cost of BB and discarding a card, Yawgmoth proliferates (Choose any number of permanents and/or players, then give each another counter of each kind already there). Here are some tips and tricks with using proliferate:
- In matchups where you are either short on creatures or need to preserve your life total, you can put one -1/-1 counter on a few of your opponent’s creatures and then proliferate to give each of those creatures an additional -1/-1 counter
- Proliferate can be used to add loyalty counters to Grist, the Hunger Tide to threaten ultimate ahead of schedule or save her from dying
- With Agatha’s Soul Cauldron, you can spend mana of any colour to proliferate. It is not uncommon to proliferate 2-3 times in a turn to set up a lethal attack with a Cauldron in play
- Proliferate can be used to alter the number of counters on your opponent’s permanents as well. You can add counters to Blast Zone, Aether Vial, or Chalice of the Void to render them ineffective. You can also add counters to an Urza’s saga to prevent your opponent from making two Construct tokens, or to Fable of the Mirror Breaker when your opponent is hellbent to deny the looting effect of the second chapter
- Proliferate doesn’t target, so you don’t need to decide what permanents to add counters to until the ability resolves. This is effective against undying effects out of Scam; you can choose not to put a counter on a creature targeted by an undying effect if that would cause it to reset
The printing of Grist, the Hunger Tide in Modern Horizons 2 helped establish Yawgmoth as a viable deck in Modern and is always played as a 4-of in the main deck. Grist is a potent threat in all of the midrange matchups, and often requires an immediate answer. Like Yawgmoth, Grist’s text box is packed with complicated and powerful abilities. Here is a breakdown of Grist’s abilities and some relevant interactions. Grist is a creature in every zone except the battlefield. This means:
- Spell Pierce, Force of Negation, and Commandeer can’t interact with Grist on the stack, but Stern Scolding can
- Chord of Calling and Eldritch Evolution can be used to tutor for Grist
- If your opponent casts Containment Priest or Hallowed Moonlight in response to a chord of Calling or Eldritch Evolution, you can still put Grist into play. However, Grafdigger’s Cage still prevents you from tutoring for Grist or any other creature
- You can exile Grist to Agatha’s Soul Cauldron to give all of your creatures Grist’s loyalty abilities. Each permanent can still only activate a loyalty ability once per turn, but this combination gives you a potent engine to generate insects and fuel future Cauldron activations
- Any copies of Grist in the graveyard will count as creatures. A Grist at 5 loyalty that ultimates will count herself as well as the other creatures already in the graveyard.
- Grist does not trigger Blood Artist/Zulaport Cutthroat when it dies and goes to the graveyard if your opponent has Stone of Erech
Grist’s +1 ability mills a card and generates a 1/1 Insect. If the milled card is an Insect, either another Grist or Haywire Mite, put a loyalty counter on Grist and repeat the process. If you are lucky, it is possible to make 3 or more insects from Grist off of a single activation. This deck utilises extra creatures from Grist better than any other deck in Modern. The 1/1 creatures protect Grist in combat, can be tapped to help Convoke Chord of Calling, and can be converted into extra cards with Yawgmoth, Thran Physician. It is often correct to uptick Grist pre-combat if you have Chord of Calling in hand, since you may generate more than one Insect and be able to Chord for Yawgmoth ahead of schedule. However, if that the Chord is going to grab a specific 1-of creature such as Gilded Goose, Haywire Mite, Hapatra, Vizier of Poisons, or Blood Artist/Zulaport Cutthroat it is often better to wait with Grist’s activation to ensure that you don’t accidentally mill the planned tutor target.
Grist’s -2 ability allows you to sacrifice a creature to destroy target creature or planeswalker. This ability is your best answer to larger creatures like Murktide Regent or Sheoldred, the Apocalypse. Here are some tips and tricks pertaining to Grist’s -2 ability:
- Grist’s -2 ability creates a reflexive trigger; sacrificing a creature only occurs when the first part of the ability resolves. If your opponent removes your only creature, this ability will do nothing. You can also choose not to sacrifice a creature, though this is extremely rare
- You choose the target for Grist’s ability when you sacrifice the creature. Once you sacrifice the creature, your opponent can no longer remove your creatures in response to counter the ability
- Grist can target herself. This is a useful tactic to put Grist in the graveyard for Agatha’s Soul Cauldron
Grist’s -5 ability causes your opponent to lose life equal to the number of creatures in your graveyard, and is primarily used to finish off your opponent after a long game. This ability doesn’t target, so you can still kill your opponent through The One RIng’s protection, Leyline of Sanctity, or Veil of Summer. With a Grist under Agatha’s Soul Cauldron, it is possible to combine multiple proliferates from Yawgmothn to set up multiple Grist ultimates in the same turn.
Agatha’s Soul Cauldron from Wilds of Eldraine is the card that finally pushed Yawgmoth firmly into Tier 1 territory. Pre-Wilds of Eldraine, most midrange decks relied on cheap removal combined with either discard or counterspells to keep Yawgmoth and Grist off of the battlefield. This plan is substantially less effective now; Cauldron turns every creature into a threat by distributing the activated abilities of Yawgmoth and Grist. Many decks struggle to interact with Cauldron, and an unchecked Cauldron often quickly takes over the game. Additionally, it enables many multi-card game-winning combos that will be discussed in detail later. Almost all Yawgmoth lists play at least 3 Cauldrons. Here are some tips and tricks for utilising Agatha’s Soul Cauldron:
- Agatha’s Soul Cauldron allows you to spend any colour of mana to activate any abilities of creatures, not just those exiled with Cauldron. This frequently comes up when activating Yawgmoth’s proliferate
- The activated ability of Agatha’s Soul Cauldron creates a reflexive trigger; you do not choose the target for the +1/+1 counter until the first part of the ability has resolved.
- Once the first part of the ability has resolved, other creatures with +1/+1 counters gain the abilities of the exiled card
- If Agatha’s Soul Cauldron is removed in response to targeting a creature in the graveyard, the card is still exiled and you still get a +1/+1 counter to put on one of your creatures
- The +1/+1 counter is not a “may” ability, you have to pick a creature to put a counter on if you have one
- If the targeted creature card in the Graveyard is exiled in response to the ability, you do not get a +1/+1 counter
- Each Cauldron is unique. This means that your second Cauldron will not be able to grant the activated abilities of the cards exiled with the previous Cauldron
- Cauldron is legendary, which means that Delighted Halfling can make Cauldron uncounterable
- Cauldron is effective as graveyard hate to weaken your opponents cards. This comes up most often against the undying effects from Scam, preventing Delirium against Murktide, or removing a creature a turn against Living End
- Be on the lookout for creatures with useful activated abilities in your opponent’s graveyard to exile with Cauldron
- You should choose creatures in your opponent’s graveyard if there are no creatures with relevant activated abilities. Creatures in your graveyard count towards Grist’s ultimate
- When there are no relevant cards to exile in your opponent’s graveyard, it is usually correct to start removing fetchlands and other useless cards from your graveyard. This prevents unwanted cards from ending up back in your library after an Endurance
Orcish Bowmasters is one of the premier cards printed in LotR and sees play in every Modern black midrange deck. At face value, the card generates two power spread across two bodies at instant speed while dealing one damage to any target. Even without punishing extra cards drawn by your opponent, this is an excellent rate. The two bodies can be used to Convoke Chord of Calling or as extra sacrifice fodder for Yawgmoth/Grist. Against decks that draw extra cards, such as Ring-based decks or Cascade Beans, a single copy of Orcish Bowmasters presents a fast clock and multiples often win the game outright. Nearly all Yawgmoth lists play 3-4 copies of Orcish Bowmasters. Here are some tips for playing with Orcish Bowmasters:
- If the target of Bowmaster’s ability leaves play before the ability resolves, you don’t amass
- Orcish Bowmaster has Flash, this often allows you to use Wall of Roots for mana on your opponent’s turn to double spell early in the game
- Just because Orcish Bowmaster has Flash doesn’t mean it should always be played on your opponent’s turn. You can play Bowmaster during your turn to get in extra damage if you already have an Orc Army or to preempt instant speed card draw when your opponent is tapped out
- If you have multiple Bowmaster triggers on the stack, you can respond to each one by sacrificing the Orc Army to Yawgmoth. This is often more valuable than a slightly larger threat
- If you have a Bowmaster in play and your opponent plays and activates The One Ring, you can target your own Orc Army with the ping. The Orc Army will survive even if it was just a 1/1 when it was targeted
Undying creatures
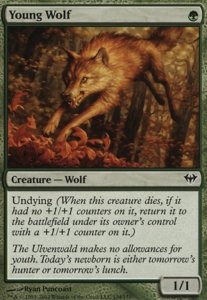
This unassuming Dark Ascension common is the fuel for Yawgmoth’s card advantage engine. With a mana cost of G, Young Wolf is the cheapest creature printed with Undying. As previously discussed, Yawgmoth, Thran Physician has the ability to “reset” undying creatures by cancelling out the +1/+1 counter with a -1/-1 counter, which allows the undying creature to be sacrificed again for value. Even without Yawgmoth, Young Wolf provides sacrifice fodder for Grist’s -2 ability and the +1/+1 counter it gets interacts nicely with Agatha’s Soul Cauldron. Young Wolf is also the perfect foil to a Turn 1 Ragavan, Nimble Pilferer on the draw. It is very rare to see a Yawgmoth deck playing less than 4 copies of Young Wolf.
Costing double green, Strangleroot Geist is the second best undying creature in the deck. The 2/1 body with haste does an excellent job pressuring your opponent’s life total or picking off planeswalkers. Strangleroot Geist is also the perfect card to pair with Eldritch Evolution, as sacrificing Geist tutors for Yawgmoth and results in an undying creature in play for Yawgmoth. This card was a 4-of pre LotR, but has been recently squeezed out to make room for more powerful individual cards. Most lists nowadays play between 0-2 copies of Geist. There are a few reasons for this decline:
- Both Eldritch Evolution and Strangleroot Geist compete for space with Orcish Bowmasters and Agatha’s Soul Cauldron
- Delighted Halfling, the primary mana dork, does not produce coloured mana for non-legendary spells. This makes it more difficult to cast Geist and another spell in the early game
- Pre-LotR, a common play pattern for Yawgmoth on the draw was to start with a Birds of Paradise or Ignoble Hierarch. Your opponent would play Wrenn and Six on turn two and kill your mana dork. A turn two Geist was able to kill Wrenn and maintain parity. The decrease in Wrenn and Six’s numbers and Delighted Halfling’s second point of toughness makes this pattern significantly less relevant
Blood Artist / Zulaport Cutthroat
Both Blood Artist and Zulaport Cutthroat share the same role of forming a game-winning combo with Yawgmoth, Thran Physician and two undying creatures (or one undying creature and Hapatra). With these cards in play, every time you use Yawgmoth to reset an undying creature your opponent loses one life and you draw a card. The ability to end a game abruptly is essential in a high-powered format such as Modern, and is the primary reason Yawgmoth has chances to win against big mana or linear combo decks. There are a few key differences between Blood Artist and Zulaport Cutthroat. Blood Artist triggers off of your opponent’s creatures dying. This is most relevant against Burn, but can help in situations where you have very little life or need to finish off your opponent. Zulaport Cutthroat doesn’t target, which means you can drain your opponent through protection from The One Ring, Leyline of Sanctity, or Veil of Summer. Zulaport Cutthroat has 1 power, so it is more useful in combat. The one power also means Cutthroat can be targeted with Pendelhaven. Overall, don’t spend too much time deliberating between these two cards, as 99% of the time it doesn’t matter. Every Yawgmoth list should have exactly 1 copy of either Blood Artist or Zulaport Cutthroat. Here are some tips and tricks that apply to both cards:
- After you assemble the combo with Yawgmoth and two undying creatures, you can draw cards to try and find Blood Artist/Zulaport Cutthroat or a Chord of Calling to tutor for the one you are playing
- You can target your own one toughness creature with Yawgmoth, Thran Physician to get extra death triggers and gain life with Blood Artist or Zulaport Cutthroat. This line most often comes up against Burn, where 1-2 life is often the difference between winning and losing the game
- Yawgmoth’s ability costs one life to activate, so you will not be able to gain life by sacrificing a creature to his ability with a Blood Artist or Zulaport Cutthroat in play if you are at one life
- In games where you end up at one life with Yawgmoth and Blood Artist/Zulaport Cutthroat in play, you will need to kill one of your own creatures in order to start using Yawgmoth’s ability. The most common ways to trigger Blood Artist/Zulaport Cutthroat at that point are Grist’s -2 ability, using Orcish Bowmasters to kill your own creature, Evoking Endurance, Chording for a Walking Ballista, or using Wall of Roots ability to add a -0/-1 counter to a creature with one toughness
- If you have Yawgmoth and two undying creatures in play but no mana to cast the Blood Artist/Zulaport Cutthroat in your hand, it is sometimes correct to draw additional cards to try and find Endurance and Chord of Calling. You can discard Blood Artist/Zulaport Cutthroat to hand size, Evoke Endurance during your opponent’s turn to put your graveyard on the bottom of your library, and use Chord of Calling to tutor for Blood Artist/Zulaport Cutthroat on your opponent’s upkeep to win the game
Hapatra, Vizier of Poisons is one of the most underappreciated cards in Yawgmoth, with a decent number of lists cutting the card completely. Having played a substantial amount of games with Hapatra, I think this is a mistake and would not register Yawgmoth for a major tournament without the first copy of Hapatra.
With Hapatra in play, every time you put a -1/-1 counter on a creature with Yawgmoth, Hapatra makes 1/1 green Snake with deathtouch. This new Snake can then be sacrificed to Yawgmoth, effectively turning Yawgmoth’s ability into “Pay 1 life: put a -1/-1 counter on target creature and draw a card”. The potent combination of Hapatra and Yawgmoth will dominate almost any battlefield in Modern, while generating substantial card advantage. It is even better if you have an undying creature in play, since you can alternate between resetting the +1/+1 counter on the undying creature and putting a -1/-1 counter on a different creature. With an undying creature, the loop looks like this (Pay 2 life: put a -1/-1 counter on target creature, Draw two cards, and make a 1/1 Snake). Here are some relevant interactions with Hapatra:
- Yawgmoth and Hapatra need another creature to sacrifice and start the loop
- Against decks without much removal, it is often correct to Chord for Hapatra early if you already have a path to Yawgmoth
- If your opponent plays removal spells that can kill Hapatra but not Yawgmoth, consider playing the latter first
- If your opponent doesn’t have any creatures, you can place -1/-1 counters on your own creatures to draw cards and make Snakes
- The Snakes enter the battlefield untapped. A common play pattern is to use Chord of Calling to tutor for Hapatra when you have Yawgmoth and an undying creature in play. You can then target your opponent’s creatures (or your own) to generate untapped Snakes and draw cards. The untapped Snakes will allow you to cast a second Chord of Calling in the same turn to find the Blood Artist/Zulaport Cutthroat and win the game. This interaction is extremely relevant against linear combo decks or Tron, where assembling Yawgmoth with two undying creatures, drawing a ton of cards, and passing the turn isn’t enough to win the game
- The Snakes have deathtouch and will do a great job deterring attacks from opposing creatures. This is also occasionally relevant if you can give a Snake Walking Ballista’s abilities with Agatha’s Soul Cauldron
- Yawgmoth’s proliferate can be used to generate multiple snakes in matchups where your life total is under pressure. This interaction helps the Rhinos matchup immensely
- When Hapatra deals combat damage to a player, you get to put a -1/-1 counter on target creature and make a Snake. This incentivises your opponent to always block Hapatra if possible
Mana dorks
One-drop mana dorks are essential to speeding up the deck’s game plan and allow you to cast Grist or Yawgmoth ahead of schedule or double spell as early as turn two. The best Yawgmoth hands all start with playing a mana dork on turn one. These mana dorks are not dead draws later in the game, since they can be sacrificed to Yawgmoth or Grist for value. Most lists currently play 5-6 of these creatures.
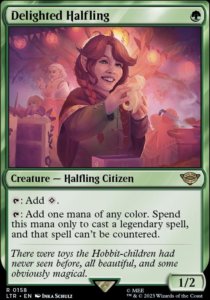
Delighted Halfling was the other major power upgrade from LotR and is played as a 4-of in every Yawgmoth deck. Delighted Halfling’s primary advantage over Birds of Paradise or Ignoble Hierarch is the additional point of toughness. Two drops like Orcish Bowmasters and Wrenn and Six heavily punish one toughness mana dorks, especially on the draw. The additional toughness also helps mitigate the amount of creatures that Fury or Fire/Ice are able to kill. Delighted Halfling has the added benefit of making Yawgmoth, Grist, Sheoldred, and Cauldron uncounterable. The downside to Delighted Halfling is that it does not produce coloured mana for non-legendary spells. This makes it difficult to cast multiple non-legendary spells in the early game. Potent sideboard cards like Necromentia or Fulminator Mage are also more challenging to cast with Delighted Halfling.
Ignoble Hierarch / Gilded Goose
After Delighted Halfling, the next best mana dorks are Ignoble Hierarch and Gilded Goose. Both of these mana dorks have different flaws, so the correct choice is metagame dependent. Ignoble Hierarch is always able to tap for coloured mana, where Gilded Goose will often only tap for mana once. Ignoble Hierarch also has Exalted, which allows you to do a bit more combat damage and better conceal obvious Chord of Calling turns. However, Ignoble Hierarch has one toughness, so it is a huge liability against Orcish Bowmasters and Wrenn and Six. Gilded Goose has two toughness and dodges pings from Orcish Bowmasters and Wrenn and Six. Gilded Goose also provides value in the midrange matchups where your opponents will use removal to immediately kill mana dorks. The best argument for Gilded Goose is its performance in the Burn matchup. With a single Gilded Goose in the deck, the matchup goes from slightly Yawgmoth favoured, but very play/draw dependent to decently Yawgmoth favoured. Overall, deciding between these two creatures is similar to Blood Artist versus Zulaport Cutthroat, where there is no clear-cut correct answer. It is important to note that the second Gilded Goose has much less value than the first, so I would recommend a split over two copies of Gilded Goose.
In powerful formats such as Modern, mana dorks that cost two or more mana are rarely good enough to see competitive play. Wall of Roots in Yawgmoth is the exception, with most decklists containing the full 4 copies. Let’s explore all of the advantages Wall of Roots has over other mana dorks:
- Wall of Roots starts with 5 toughness. This makes it immune to all of the commonly played red removal except Unholy Heat with Delirium. Wall of Roots can also block most early threats
- Wall of Roots can add mana the turn it comes into play, which helps offset the two mana used to play it
- Wall of Roots can add mana on your turn and on your opponent’s turn, sometimes making it a mana neutral play
- Wall of Roots can tap for Chord of Calling in addition to making mana. A common play pattern with Wall of Roots and Chord of Calling is to use the Wall mana to play a one-drop creature on your turn. The Wall and the one-drop help Convoke Chord of Calling during your opponent’s turn, giving you an additional mana for Chord of Calling
- Once you no longer need the mana from Wall of Roots, begin downticking it. Killing your own Wall of Roots triggers Blood Artist/Zulaport Cutthroat and puts Wall in the graveyard for Cauldron. It takes 2.5 turn cycles to kill Wall of Roots, so the process needs to be started in advance
To use Wall of Roots to its full potential, you should be aware how state-based actions interact with mana abilities while casting a spell. State-based actions (i.e. putting a creature with 0 toughness into the graveyard) are only checked when a player gets priority (i.e. before and after casting a spell or activating an ability but not during). This means that a 0/1 Wall of Roots can tap to Convoke Chord of Calling and add a mana to pay for the Chord. The same interaction also works with Eldritch Evolution, where a 0/1 Wall of Roots can add mana to pay for Evolution and be sacrificed to Evolution. It is important to note that these interactions do not work on Magic Online, where Wall of Roots mana ability can only be used as an instant.
Tutors
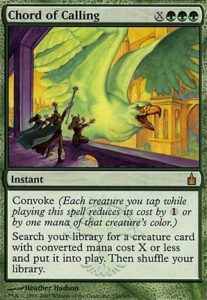
Chord of Calling fits perfectly into Yawgmoth’s gameplan. The deck typically floods the board with creatures in the early turns, allowing Chord of Calling to be cast for little to no mana. Chord of Calling often finds either Yawgmoth or Blood Artist/Zulaport Cutthroat once you have the Yawgmoth’s Bargain combo established. Chord of Calling can also be used to find Grist, Orcish Bowmasters, an undying creature, or whatever utility creature is ideal for the specific situation. Every Yawgmoth deck plays a full 4 copies of Chord. Here are some tips and tricks for playing with Chord of Calling:
- Wall of Roots interacts very favourably with Chord (see the section on Wall of Roots).
- Wall of Roots, the first Orcish Bowmaster, and all of your one-drop creatures are mana neutral with Chord
- Chord costs XGGG, so Orcish Bowmaster, the Orc Army, and Yawgmoth can only help pay for X. Plan accordingly and don’t get caught with just XGG to cast it
- Chord of Calling is an Instant and is most commonly cast during your opponent’s end step or in response to an opposing spell. However, if your opponent is unlikely to interact, you can cast the spell during your turn
- If you plan to wait to cast Chord of Calling on your opponent’s end step, it is often correct to fetch during your turn. A skilled opponent will realise that you are representing Chord of Calling and can remove a creature in response to the fetch, leaving you a mana short for Chord of Calling
- When there is no downside, always Chord for a higher value of X to conceal what creature you plan to get. This sometimes confuses your opponent and can result in misplays
- Against blue decks, try to play around Spell Pierce when possible. Yawgmoth has few good targets for the spell, so try to keep it stranded in your opponent’s hand
- Against decks with lots of removal and no counterspells, it is usually correct to board out a few copies of Chord of Calling. Drawing multiple copies of Chord of Calling with no creatures in play can be game-losing
- Don’t be afraid to Chord for Dryad Arbor or Delighted Halfling if you need mana acceleration in the early game
Eldritch Evolution is a former Yawgmoth staple that has seen a sharp decline in play since the printing of Agatha’s Soul Cauldron. Eldritch Evolution is the cheapest way to tutor for Yawgmoth, and the deck plays many expendable two drops. When possible, Strangleroot Geist is the best card to sacrifice. Eldritch Evolution is very weak against counterspells, since sacrificing a creature is an additional cost of the spell. Evolution is also very awkward in multiples, especially against decks that play creature removal. The card is at its best in linear matchups, where finding Yawgmoth is essential to winning the game. Most decklists currently play 0-1 copies of Eldritch Evolution.
Diabolic intent is a card that looks tailor made for Yawgmoth. The deck has an abundance of expendable creatures to sacrifice, making Intent feel more like a Demonic Tutor. In addition to finding creatures, a single copy of the versatile tutor acts as an additional copy of Cauldron, while not being a dead draw when there is a Cauldron in play. It also tutors for powerful 1-of sideboard cards like Chalice of the Void, Endurance, Legion’s End, or Engineered Explosives in matchups that revolve around finding cards in the early game. While the card sounds good in theory, after extensive testing it is just too slow for Modern. However, Intent may be worth revisiting if another powerful noncreature spell gets incorporated into the main deck of Yawgmoth.
Tutorable Flex Slots
The deck often plays between one and three singleton tutor targets in the main deck, with additional targets in the sideboard. Depending on the exact metagame, the configuration of utility creatures can greatly improve Yawgmoth’s game one win percentage. Here are the most common tutor targets and the matchups that they are useful against.
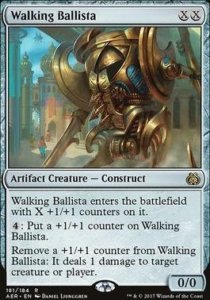
Walking Ballista is a recent addition to Yawgmoth that found its way into the main deck due to its interactions with Agatha’s Soul Cauldron and undying creatures. Once an undying creature has Walking Ballista’s abilities, the creature can “reset” itself by removing the +1/+1 counter. This effectively makes the undying creature immune to damage and destroy effects. It can even dodge exile effects, such as Solitude, by removing the +1/+1 counter to do 1 damage to itself. Walking Ballista’s second ability is a useful mana sink that significantly complicates combat math for your opponent. Casting Chord of Calling for X=0 puts Walking Ballista straight to the graveyard for Cauldron. Walking Ballista is a key cog in many of the multi-card combos with Agatha’s Soul Cauldron. Additionally, Ballista can act as early removal for a Ragavan, Nimble Pilferer, Dragon’s Rage Channeler, or Dauthi Voidwalker. Later in the game in midrange matchups, a 2/2 or 3/3 Ballista is often an above-average topdeck. Walking Ballista is great against linear combo, big mana, Four Colour variants, and Scam, while being serviceable in many other matchups. A single copy of Walking Ballista is usually played in the main deck, though some lists opt to cut it for a different utility creature.
Much like Walking Ballista, Spike Feeder interacts favourably with Agatha’s Soul Cauldron and an undying creature. With Spike Feeder’s abilities, an undying creature is immune to damage based removal or destroy effects, but not exile effects. The life gained by Spike Feeder is often relevant, as this deck uses life as a resource to fuel its card drawing engine. Creatures with Spike Feeder’s abilities can move their counters to other creatures. This complicates combat math for your opponent, acts as protection against damage-based removal, and spreads out counters for Yawgmoth’s proliferation. The life gain from Spike Feeder also makes it difficult for your opponent to close out the game with unblockable creatures or multiple burn spells. Additionally, Feeder fills a similar role to Gilded Goose in the Burn matchup, where a single copy greatly increases your matchup percentage. Similar to Ballista, Feeder is part of many multi-card Cauldron combos that are discussed in detail later. Feeder is best against Burn/Zoo and midrange decks, and weaker against big mana, linear combo and other decks that don’t pressure your life total. Feeder has seen play as a 1-of in either the main deck or sideboard.
Unlike most creatures in this deck, Sheoldred is a threat by herself that often demands an immediate answer. The quick clock from Sheoldred is especially punishing decks reliant on The One Ring and Up the Beanstalk for card advantage. The life gained by Sheoldred is a great way to buffer your life total against Burn and other aggressive decks. In addition, Sheoldred gains life off of each draw from Yawgmoth’s ability. Most Yawgmoth lists run one copy of Sheoldred between the main deck and sideboard. In the main deck, it’s ideal to pair Sheoldred with a copy of Eldritch Evolution to increase access to the card. Sheoldred is at her best against aggro and midrange decks and struggles against big mana and linear combo decks.
Haywire Mite is the cheapest creature that can remove artifacts and enchantments. Due to its low mana cost, Haywire Mite can easily be found off of Chord of Calling in the early game when it is needed. The exile clause on Mite is relevant against indestructible cards such as The One Ring, Kaldra Compleat and Heliod, the Sun Crowned. A Haywire Mite imprinted on Agatha’s Soul Cauldron is often game-winning against decks that rely on artifacts and enchantments, such as Hammer or Affinity. The two life is also relevant, especially against Burn or other aggressive decks. Every decklist plays at least one copy of this card between the main deck and sideboard. Haywire Mite is at its best against decks with Saga, Cauldron, Ring, or Leyline Binding. Mite is not as useful in game one against midrange decks like Murktide, Scam, or Rhinos, but still has utility in postboard games.
Fulminator Mage is the best tutorable tool against big mana decks like Titan, Tron, or Coffers. Out of all of the utility creatures that don’t form “infinite” combos, Fulminator has the highest ceiling. Most Modern decks will struggle to beat a turn 2 Fulminator Mage into a turn 3 Agatha’s Soul Cauldron. However, without a Cauldron in play, Fulminator Mage is very underwhelming against the aggro and midrange decks of Modern.
Endurance was once a mainstay in Yawgmoth, with most lists playing 3-4 copies between the main deck and sideboard. Since the printing of Agatha’s Soul Cauldron, combined with shifts in the Modern metagame, most lists are down to 0-2 copies. Endurance is a very versatile card, often acting as instant-speed graveyard hate, a 3/4 flash blocker, or a way to get 1-of combo pieces back into the deck. Here is a brief overview of some of the relevant interactions you will come across:
- Endurance can be evoked to shuffle back in your opponent’s graveyard in response to a Living End or Unholy Heat with Delirium. It is often correct to sacrifice creatures to Yawgmoth to try and find an Endurance in response to these spells
- After evoking endurance, you can sacrifice it to Yawgmoth to recoup a card
- Endurance can be evoked as a pseudo Elvish Spirit Guide to help Convoke Chord of Calling
- Unlike the other Incarnations, Endurance’s Evoke trigger isn’t always stacked last. This comes up in situations where you want to target yourself and end up with Endurance in your library
- When you cast Endurance, you can choose no targets if neither player has any relevant graveyard-based strategies
- When there is no reason to target your opponent, it might be correct to target yourself if a 1-of tutor targets like Hapatra, Dryad Arbor, or Blood Artist/ Zulaport Cutthroat is in the graveyard
The Manabase
The core – fetchlands, shocks, basics, fastlands, and Mire
The universally agreed upon fetchable manabase consists of 2 Forests, 1 Swamp, and 2 Overgrown Tomb. To support these fetchable targets, the deck plays 4 copies of Verdant Catacombs, and 0-2 additional green fetchlands. The additional fetches are good against Blood Moon, turn on revolt for Fatal Push, and act as additional tutors for Dryad Arbor. The deck also plays 1-4 Blooming Marsh, which is a painless dual land in the early game. I would not run more than 3 Marsh, entering tapped on turn 4 can be very punishing.
With the increased colour requirements brought on by Delighted Halfling’s shortcomings as a mana dork, most lists play 2 Twilight Mire. A single Mire fixes all of your colour requirements and allows you to fetch basics early in the game to conserve life. In postboard games, it is often important to have access to BB on turn 2 after casting Halfling on turn 1 to cast Fulminator Mage/Necromentia against big mana decks. Running more than 2 increases the chance of the dreaded 2-land double Mire hand, which is almost always a mulligan.
Utility Lands
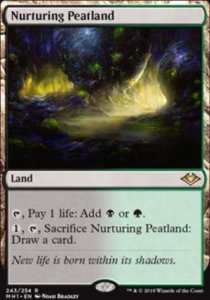
Lands that can be converted to cards later in the game should always be up for consideration. Peatland enters untapped and produces both green and black at the cost of 1 life. This deck utilises life as a resource to fuel Yawgmoth activations and is fairly mana-hungry. Most lists run 1-2 Peatland, since drawing more than one copy of Peatland in the early game leads to a lot of incidental life loss.
Dryad Arbor is often maligned as the worst card to draw in the deck since it both doesn’t add mana the turn it comes into play and is extremely fragile to creature removal. Despite this, having a single Dryad Arbor in the deck allows the deck to convert any fetchland into a creature. This interaction comes up frequently to provide an additional creature to sacrifice to Yawgmoth/Grist, make a surprise block, or provide a target for Cauldron. Additionally, Dryad Arbor can be found by Chord of Calling for X=0 or after opposing Boseiju, Who Endures. I consider Dryad as a mana dork rather than a land. However, if you elect not to play Arbor, I would replace it with a different utility land.
Khalni Garden began seeing significantly more play in Yawgmoth with the incorporation of Arboreal Grazer as a mana dork pre-LotR. While Grazer is no longer played thanks to Delighted Halfling, Khalni Garden performs well even in its absence. Yawgmoth currently plays less mana dorks than previous iterations, allowing Khalni Garden to act as an additional turn one play. The extra creature helps Convoke Chord of Calling and is sacrifice fodder for Yawgmoth or Grist. Most lists play one copy, as multiple lands that come into play tapped can significantly slow down the deck in the early game.
Modern has a significant amount of powerful artifacts, enchantments, and lands that Boseiju answers. In the early game or against decks that don’t have meaningful targets, Boseiju can just be played as an untapped green source. Two copies of Boseiju, Who Endures is the perfect number. The Legend Rule is almost never a substantial downside with only two copies. It is often correct to hold Boseiju in hand against decks with relevant targets. Remember that Yawgmoth, Hapatra and Sheoldred decrease the cost of the Channel ability.
Pendelhaven initially began seeing play as a way to protect Orcish Bowmasters from opposing Orcs. However, Pendelhaven consistently overperformed expectations and should have been incorporated into the deck long before. In addition to protecting Orcish Bowmasters, Pendelhaven mitigates the damage done by split removal spells like Fury or Fire/Ice and complicates combat. Every list should play a single copy.
The current configuration of the deck has room for 2-3 lands that don’t produce green. Takenuma is the best black utility land; it can return creatures from your graveyard, fuel Cauldron, and act as a Swamp in the early game. It is important to note that you have to select a creature if there is one in your graveyard. This is relevant if you would prefer to exile that creature with Cauldron. Most lists play 1 Takenuma.
[mtg_card]Urborg, Tomb of Yawgmoth[/mtg_card] and Yavimaya, Cradle of Growth
Both these lands have seen play in Yawgmoth previously but have fallen out of favour recently. Almost every land in the deck produces green, and all of the other utility green lands are superior to Yavimaya. You can make a reasonable case for playing Urborg, since it helps cast the BB spells on time in postboard games and activate Yawgmoth’s proliferate. Access to proliferate is less important now, since Cauldron removes the coloured mana requirement. Urborg is symmetrical, which is a major downside against Domain decks and Cabal Coffers. Most lists do not play either of these cards, but 1 copy of Urborg is reasonable in metagames that don’t contain Coffers.
Modal Double-Faced Cards
It is always worth considering any land that provides value when drawn in the mid to late game. The two best MDFC lands for this deck are Agadeem’s Awakening and Hagra Mauling. Both lands have powerful effects, but steep drawbacks (either coming into play tapped or costing 3 life to enter untapped). The spell-lands are fringe playable, and occasionally make it into the main deck.
Sideboard options
Tutor Targets
The sideboard of Yawgmoth often contains multiple creatures with powerful effects that are only situationally good. Only a single copy is needed for most of these creatures, since Chord of Calling and Eldritch Evolution can act as additional copies.
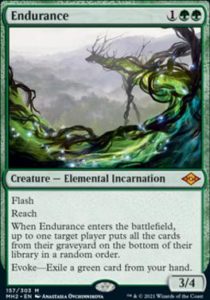
Endurance is a versatile card that provides potent graveyard hate as early as turn 1. Endurance comes in against graveyard-based combo decks (Storm, Breach, Reanimator, Living End), midrange decks with Unholy Heat (Murktide, Grixis Shadow, Jund Saga), Mill, and against slow control decks with Counterspells (UW Control). Endurance is a serviceable card against Scam, and will occasionally end up in the deck postboard if there are no better options. Endurance should not be brought in against Yawgmoth, where it often only stops a single undying creature or Cauldron activation. Despite its versatility, Endurance is rarely a good tutor target. If your metagame demands this effect, play multiples to increase the chance of naturally drawing it. Most Yawgmoth decklists play 0-2 copies of Endurance between the main deck and sideboard.
Fulminator Mage shines against big mana decks such as Titan, Tron, and Coffers. Unlike many of the other options, Fulminator is better in multiples. It often competes with Necromentia for sideboard slots and most sideboards contain two copies of one of these cards. Fulminator Mage is much better against Titanshift, Coffers and Cascade Beanstalk than Necromentia.
Due to its role as cheap artifact and enchantment removal, every list should play at least one copy of Haywire Mite in the 75. Mite comes in against any deck with Urza’s Saga, Agatha’s Soul Cauldron, The One Ring, or Leyline Binding. Additionally, it is usually correct to board in 1 Haywire Mite in most midrange matchups to counteract graveyard hate (Leyline of the Void, Stone of Erech, Unlicensed Hearse, etc.) or as an answer to Pithing Needle or Grafdigger’s Cage.
Sheoldred, the Apocalypse is a powerful individual card that is excellent against both aggro and midrange strategies. Sheoldred often replaces Blood Artist/Zulaport Cutthroat in matchups where a combo kill isn’t as relevant. Almost all lists play a single Sheoldred between the main deck and sideboard.
On the surface, Soulless Jailer seems like a terrible card in this deck. Its symmetrical effect prevents undying creatures from returning to the battlefield, which is instrumental to Yawgmoth’s gameplan. However, this downside is largely mitigated by the fact that Yawgmoth can sacrifice Jailer once its effect is no longer needed. Soulless Jailer is primarily used for the Cascade matchups, as it prevents Crashing Footfalls and Living End from being cast from exile.
Due to its interaction with Cauldron, Spike Feeder is the best card to play against Burn or other aggressive decks. Feeder also unlocks the potential for additional multi-card combos with Cauldron. Some lists play 1 copy in the main deck or sideboard.
Phyrexian Metamorph[/mtg_card]
Phyrexian Metamorph is a versatile clone that was played to copy Archon of Cruelty when Creativity was the top deck in Modern. The One Ring, Elesh Norn, Mother of Machines and the Evoke elementals are also excellent targets for Phyrexian Metamorph. Since the decline of Creativity, Metamorph is rarely seen in Yawgmoth sideboards.
Outside of Fatal Push, most commonly played removal spells in Modern are either white or red. This makes Crusader incredibly difficult to remove once it is in play. Crusader is largely a dedicated hate card for the Four Colour/Cascade Beanstalk. Crusader allows the deck to change strategies and ignore the removal and life gain out of these decks while attacking 5 times. Like Fulminator, this card is better in multiples and I would recommend 3-4 copies for this strategy to be effective. Unless this matchup is extremely prevalent in your metagame, Crusader is likely not worth taking up 3-4 sideboard slots. Most Yawgmoth lists do not play this card.
Collector Ouphe is extremely potent against decks that both contain powerful artifacts and run very little removal, such as Tron and Hardened Scales. Unfortunately, Ouphe’s ability is symmetrical and also turns off Cauldron. For this reason, Ouphe rarely sees play anymore. However, the first copy is useful in metagames filled with Tron and Hardened Scales.
Necroplasm is a dedicated hate card for Rhinos and the only tutorable way to destroy multiple Rhinos at once. Unfortunately, Necroplasm is not useful in any other matchup. In metagames with enough Rhinos players to justify Necroplasm, it is probably better to just pick a different deck.
Reclamation Sage used to see play in the deck, but has largely been replaced by Haywire Mite. The only reason Sage is mentioned here is as a reliable answer to Cursed Totem. If Yawgmoth continues to perform well, it may be necessary to have an answer to Totem that can be found with Chord of Calling.
Tranquil Frillback is a versatile card that is slightly overcosted for each effect. It is another potential answer to Cursed Totem that would have more utility in other matchups than Reclamation Sage.
Masked Vandal is the final card for consideration as an answer to Cursed Totem. Vandal costs only two mana and is the cheapest of the options. However, Vandal requires a creature card in your graveyard to destroy Totem. Most decks already bring in some amount of graveyard hate against Yawgmoth, making Vandal’s effect inconsistent. Additionally, Vandal’s utility against Saga decks is limited, since most of these decks are light on creature removal.
Card Advantage Engines
The printing of LotR introduced two powerful card advantage engines in The One Ring and Elven Chorus. These cards fit the old adage of “four drop for the grindy matchup”, and are useful sideboard options against midrange decks. In such matchups, opponents commonly board in additional creature removal and graveyard hate. Both The One RIng and Elven Chorus overwhelm removal and sidestep graveyard hate. These permanents are also difficult to remove and often operate unchecked. Since the printing of Cauldron, I have rarely registered these cards after WOE and instead relied on Yawgmoth, Grist, and Cauldron to carry the midrange matchups and use the sideboard slots to improve other weaknesses. However, I am in the minority, and most decklists play two copies of one of the cards. If you are new to Yawgmoth, I would definitely recommend playing some copies to help with the midrange matchups.
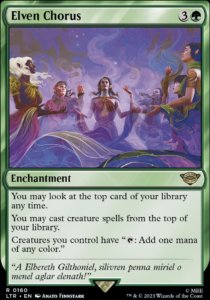
With an Elven Chorus in play, all of your creatures are mana dorks and you can cast creature spells from the top of your library. Yawgmoth, Grist and shuffle effects allow you to manipulate the top card of your deck to help get through noncreature pockets. Chorus is best when you are low on mana or against Blood Moon. Chorus also doesn’t draw cards, making it better against Sheoldred, Bowmaster and Narset than The One RIng. Despite these advantages, I think Chorus is a deckbuilding trap and I would not recommend playing it over The One RIng. Chorus is very good at winning games when you are already ahead and bad at turning around games in which you are behind. The midrange matchups often involve a substantial amount of creature removal, negating Chorus’s ability to generate large amounts of mana. Due to this, it is unlikely you will be able to take advantage of Chorus the turn you cast it. Scam, the most popular midrange deck, plays multiple cheap threats that are able to win the game before Chorus comes online. Chorus can’t find removal spells, which are the best way to stabilise the battlefield against Scam’s fast starts. It’s also difficult to resolve against the counterspell-based midrange and control decks. Chorus doesn’t always generate card advantage since the deck composition postboard is usually less than 50% creatures in the midrange matchups. Chorus also lines up poorly against both Grafdigger’s Cage and Cursed Totem, the two most powerful sideboard cards against Yawgmoth. It is not all negative though, as Chorus shines against Coffers, a deck that lacks enchantment removal and a quick clock but has Karn, Sheoldred and Bowmasters to punish Ring. Chorus is also still good against Scam and Jund, especially their draws with Sheoldred or Bowmasters where Ring could be a liability.
The One Ring is one of the best standalone card advantage engines ever printed. If left unchecked, it will quickly bury your opponent in card advantage. Unlike Chorus, The One RIng is good at turning around games where you are behind on board. Ring grants you protection from everything for a turn, which buys time to dig for a way to stabilise. The Ring gives you a card immediately, even on an empty board. The Ring is legendary, so Delighted Halfling can help resolve it through counterspells. Additionally, it’s unaffected by both Grafdigger’s Cage and Cursed Totem and quickly digs for answers to these permanents. The Ring also isn’t impacted by the lower creature count after sideboarding. Despite these advantages, there are still some downsides to The One Ring. Both Ring and Yawgmoth tax your life total substantially. This becomes very problematic if your opponent has Sheoldred, Orcish Bowmasters, or burn spells. Fortunately, Haywire Mite can be used to remove your own Ring if the life loss is too significant.
Utility Spells
The remaining slots in Yawgmoth’s sideboard are dedicated to situationally powerful spells to replace bad cards or shore up difficult matchups.
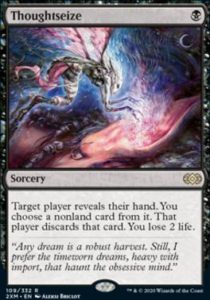
Once a staple in Yawgmoth’s sideboard, Thoughtseize has seen less play recently. Unlike many of the sideboard cards, Thoughtseize can be brought in against a large range of matchups. This type of sideboard card is valuable, as it allows you to replace the worst cards in your deck while still providing value. Thoughtseize is best against big mana and linear combo decks, where the cheap disruption buys you enough time to find a way to win. Thoughtseize is also great against Scam, which often operates like a combo deck for the first two turns of the game. On the play, Thoughtseize is the best possible turn one play against Scam and on the draw it is still a good answer to Dauthi Voidwalker or Fury. Thoughtseize isn’t nearly as good against other “fair” midrange strategies, as it is a bad topdeck in attrition battles. Lists play anywhere from 0-4 copies, often replacing the value four drops.
Necromentia is an excellent card against most big mana and linear combo decks. The manabase of this deck is specifically built to be able to cast this spell (or Fulminator) reliably on turn two in postboard games. As mentioned above, Necromentia and Fulminator Mage often compete for the same sideboard slot. Necromentia is much better against the linear combo decks like Living End, Belcher, Calibrated Blast, while still being very good against Tron and Titan. Necromentia-like Extraction effects are the most overboarded cards in Modern. Only bring in Necromentia if it will be incredibly difficult for your opponent to win without the extracted card. For example, Living End’s backup plan to cast cycling creatures is unlikely to be successful. However, decks like Creativity or Yawgmoth still have powerful gameplans if their namesake card is extracted. Additionally, Combo decks like Twiddle Storm and Titanshift have multiple paths to victory after Necromentia.
Force of Vigor is a necessity in the sideboard to contain explosive starts from Urza’s Saga-based decks like Hammer, Hardened Scales, or Amulet Titan. Force is also useful against decks with Leyline Binding and Up the Beanstalk. Almost all lists play at least two copies in the sideboard. As a general rule, the first copy can be brought in if your opponent has at least four good targets and all of them should come in against decks with eight or more good targets.
Chalice of the Void is played primarily as a zero mana way to shut off Crashing Footfalls and Living End. The first copy is often more valuable than the second, since a Chalice on zero prevents you from casting any additional Chalices. Chalice is also very valuable against decks that play a large density of one mana spells, especially on the play. Almost every decklist plays 1-2 Chalices in the sideboard.
Like Chalice of the Void, Void Mirror is primarily played for the Cascade matchups. Unlike Chalice, Void Mirror is also good against Cascade Beanstalk, where it counters any spell found off of Cascade, evoked Elemental or pitchcasted Force of Negation and Commandeer. It is important to remember that Void Mirror is symmetric. Void Mirror will counter a Chord of Calling that is cast with only Convoke, evoked Endurance, or pitchcasted Force of Vigor. Void Mirror is less relevant than Chalice in other matchups, and should only be played over Chalice in metagames that contain a decent amount of Cascade Beanstalk.
Board Wipes for Rhinos
Rhinos remains one of Yawgmoth’s most difficult matchups. Most sideboards include one or two ways for removing multiple Rhinos from the battlefield at once. Unlike Necroplasm, many of these cards are useful in other matchups. Legion’s End, Maelstrom Pulse, and Engineered Explosives are all good choices that are useful in a variety of matchups. Filigree Sylex and Crime/Punishment require very specific metagames to be the best option. Here is a breakdown of all five cards:
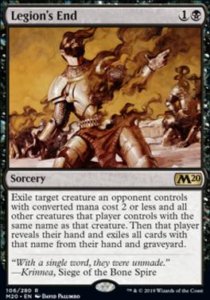
Legion’s End is the best card against decks with powerful two drop creatures like Scam, Domain Zoo, or Jund. Legion’s End is also very good against decks with a mix of one and two mana creatures such as Prowess, Murktide (if they have Ledger Shredder or Questing Druid), Hammer, and Scales, though there are slightly better options for each of these matchups. Due to being a sorcery, Legion’s End is not a good answer to an end of turn Violent Outburst out of Rhinos.
Maelstrom Pulse is the most versatile answer, but also the most expensive. Pulse is the best option against decks with permanents that cost two or more mana such as Up the Beanstalk or Murktide. Pulse also has additional value as an answer to opposing hate cards such as Cursed Totem or Leyline of the Void. Much like Legion’s End, Pulse does not interact favourably with Violent Outburst.
Engineered Explosives is the best card against decks with multiple powerful one drops such as Hammer, Prowess, or Shadow. Explosives is also very good against Hardened Scales, though there are slightly better options for that matchup. Out of these options, Explosives is probably the single best card against Rhinos. Explosives cost zero, so there is no tempo loss against Force of Negation. Additionally, the activation can be held up at instant speed to counteract an end of turn Violent Outburst.
Much like Explosives, Filigree Sylex interacts favourably against Violent Outburst. Sylex is the best card against Creativity or Glimpse of Tomorrow, since there is no mana cost to hold up its activation. However, the turn delay before destroying one drops makes it worse than the other options in nearly every other matchup. This card should only be played if Creativity makes a meaningful resurgence.
Crime//Punishment is the best card against Hardened Scales and Affinity, where Punishment for zero kills Urza’s Saga along with the other zero casting cost artifacts. Crime/Punishment on one is still valuable against Prowess and Hammer, though it is much worse than Explosives. It also does not prevent an end of turn Violent Outburst. This is the worst of the presented options, and should only be played if Hardened Scales and Urza’s Saga are overrepresented in the metagame.
Creature removal
In the main deck, both Grist and Yawgmoth are the only answers to opposing creatures. Both of these answers are expensive and struggle to interact with one or two mana evasive threats such as a turn one Grief, Dauthi Voidwalker, Dragon’s Rage Channeler, Ledger Shredder, or Murktide Regent protected by cheap disruption. Black-based removal spells are played to combat these threats and buy time for Grist and Yawgmoth to come online. In addition to the midrange matchups, the removal spells also come in against the mirror, Hammer, and Scales. Most lists play 2-4 creature removal spells in the sideboard.
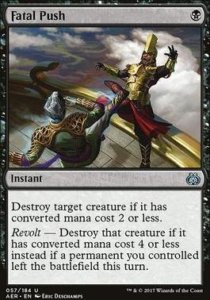
Fatal Push is the cheapest option in this department, and best answer to any creature that costs 4 or less mana. Any fetchland or one of your creatures dying will turn on revolt. The main creatures that Push does not hit are Murktide and Fury.
For one more mana than Fatal Push, Go for the Throat is able to kill nearly every threat in Modern, including Murktide and Fury. However, Go for the Throat isn’t perfect, as it does not kill any of the creatures out of Hardened Scales.
Pile On has Convoke, so it can often be cast for less mana than four. Pile On is the cheapest answer to planeswalkers and Surveil is useful to set up future draws and fuel Cauldron. However, Pile On suffers from a similar problem as Elven Chorus. Many of the midrange matchups play a substantial amount of creature removal, making Convoke less reliable in the early game.
Tear Asunder provides cheap artifact and enchantment removal in the early game that can be used on any nonland permanent in the midgame. Despite being slightly overpriced, this versatility helps justify playing the card. Tear Asunder is an excellent answer to Cursed Totem or Leyline of the Void, since it can be used as creature removal in the absence of these hate cards. Tear Asunder is best against decks like Scam, Four Colour, or Ring-based midrange decks that will have relevant artifacts and enchantments to exile.
The End is the newest removal spell to make it into some Yawgmoth decklists. Exile removal is relevant against Scam, and the extraction effect is very powerful against Evoke elementals and Primeval Titan. However, 4 mana is very expensive; the deck needs cheaper answers to buy time for Yawgmoth, Grist, or Cauldron to take over the game. Additionally, Tear Asunder is a better card in the matchups where The End is useful.
Assassin’s Trophy will destroy anything for 2 mana, making it the most versatile removal spell. Unfortunately, the extra land from Trophy often puts Yawgmoth farther behind in the midrange matchups. Do not play this card unless there is a substantial amount of big mana decks in the metagame. Even then, there are likely better options.
Abrupt Decay does not hit Grief, Fury, Murktide, Sheoldred, Yawgmoth, Omnath or Leyline of the Void; do not play this card.
Wishlist for Future Sets
Both LotR and WOE spoiled Yawgmoth pilots with major upgrades from Delighted Halfling, Orcish Bowmasters, and Agatha’s Soul Cauldron. This was an unexpected surprise; I do not expect future sets to provide the same level of upgrades for Yawgmoth. However, there is still plenty of room for small improvements to role players. Here are some potential card designs for role players to be on the lookout for in the future:
- A one drop mana dork with 2 toughness that produces coloured mana
- A better answer to Cursed Totem than Reclamation Sage, Masked Vandal, or Tranquil Frillback that can be found with Chord of Calling
- A better three drop creature than Necroplasm that destroys multiple Rhinos
- Small upgrades to black removal spells for the sideboard
- A better version of Blood Artist/Zulaport Cutthroat, ideally with 2 toughness.
- A useful black or green utility land, especially one that generates tokens. Mirrex would be playable if it consistently made coloured mana or if the tokens could block