

If you are new here, don’t forget to check our Discord Channel. It’s free for everyone!
If you liked this primer and want to read more high level Spy content, check out my Spy Walls sideboard guide.
If you want to watch me playing the deck, consider checking our Youtube Channel where we post vods from our streams. There’s plenty of Spy Walls content!
This is an update of the article I posted n August 2025. While the deck hasn’t changed much (the only two major changes are the addition of Elves of Deep Shadow and Haunting Misery as an answer to graveyard hate), the metagame shifted a bit, as well as other players’ plans to stop us, so the update was needed. I hope you’ll like it!
Introduction
What is Spy Walls?
Spy Walls is a combo deck that abuses the card Balustrade Spy. The gameplan is simple: tutor all lands from your deck, cast Spy, mill the deck, cast Dread Return targeting Lotleth Giant, and deal your opponent a lethal amount of damage with it. Since the deck is filled with creatures, sometimes it’s possible to win without the combo by playing a midrange game, but more about it later. Compared to previous builds of Spy, the addition of Walls speeds up the deck and to make sure that you’ll always have enough creatures for a Dread Return’s flashback.
Why should you play the Walls build over others?
The Spy Walls build is relatively new find. The whole concept was around for years, basically since the introduction of Dread Return and Lotleth Giant to the format, but the lack of critical mass of land tutors that are stapled to creatures didn’t let this idea thrive. With the printing of Generous Ent, Troll of Khazad-dum and Many Partings in Lord of the Rings, the five land version was discovered. It later evolved into a six land build – not as all-in and more focused on the midrange plan, thanks to the addition of Writhing Chrysalis. After the release of Sagu Wildling, it became possible to add the Spy combo to any green creature deck that could support Land Grant. Both Elves and Walls were experimenting with it, but eventually, the Wall build became more successful, mainly because their creatures were harder to kill and could buy more time thanks to being useful while blocking.
The addition of 12-14 mana dorks stabilised the mana. As a consequence, it was possible to cut the fifth land from the deck, and the fewer of them you have to tutor, the faster your goldfish time can be. More mana dorks also means that hardcasting expensive monsters is a viable way of victory and the deck is not as vulnerable to land destruction as the previous iterations of the archetype were. It’s also trivial to have six or more creatures on the battlefield, so once Balustrade Spy resoles, it’s possible to cast not one, but two Dread Returns – it made the matchup against Counterspell decks and decks with a lot of lifegain (Weather the Storm decks, Elves, Mono White, etc.) much more manageable.
Strengths
Spy Walls is a good example of why combo decks with a good plan B are scary to play against. The combo part of the deck almost always comes down to one card – if you have it, you win on the spot. Of course, there are multiple other requirements that need to be met (tutoring all lands, having three or more creatures in play, etc.), but they often are fulfilled by simply playing the game. It’s quite easy to execute the combo on turn four, and sometimes it’s even possible to do it on turn three! The threat of a one card combo that early makes playing against Spy Walls a nightmare – the opponents always have to keep the mana up, have a dedicated hate at the ready, etc. This costs them tempo, and thanks to it, our plan B is very effective.
Weaknesses
While having a one card combo is very appealing, it also creates some dangers. Milling the library can lead to an instant win, but if the opponent has an answer, it leads to just as quick of a loss. The combo uses creatures, graveyard and the stack, so any form of interaction can be effective, although there are ways to play around it. Some of them like Counterspell, Nihil Spellbomb, Krark-Clan Shaman/Crypt Rats, etc. are maindeckable, while others come into play after sideboarding. You should always be prepared that you’ll face some form of interaction, and most opponents will attack you from multiple angles.
The biggest challenge is the fact that some cards are extremely good against us and anyone can add a few copies to the sideboard – for example Faerie Macabre is a zero mana ‘you win the game’ card, so you need to be prepared that sometimes you’ll simply lose to the opponent who’ll come packing hate – that’s the price you have to pay if you want to play a broken combo deck.
My current list
If you can’t see the link or want a downloadable version, click here.
If you can’t see decklists and links, it’s likely because you didn’t accept cookies. Doing so is mandatory for the website to work correctly.
Primer
The manabase
In my opinion, the most unique part of the deck is its manabase. While it plays so few actual lands, it’s essential for the deck to find all of them before you try to combo out. Let’s talk about each section:
- Actual lands. The majority of Spy Walls players are settled on playing four lands. There’s still a discussion whether 3/1 or 2/2 is a better split, and there are solid arguments for both. Playing three Forests drastically improves goldfishing, as there’s more tutors that can only get Forests (full playsets of Land Grants and Generous Ents) than those solely finding a Swamp (1-2 copies of Troll), which makes getting all four lands out of the deck quickly more reliable. On the other hand, having a second Swamp makes Dread Return hardcast much easier, playing around Cleansing Wildfire, etc. It also makes the line of discard into Balustrade Spy available, but all of these outcomes can be achieved by playing mana dorks that produce black (more about it later). What’s worth noting, there’s a significant risk of drawing too many forestcyclers while having a Swamp in the deck that stops our combo. In my opinion, this problem can be solved by playing a 3/1 split and running the second Swamp in the sideboard, so you keep the deck streamlined, but have the ability to switch to 2/2 when you board in black cards or even go up to five lands if you expect to play a long, midrange game or that the opponent will attack your mana with Cleansing Wildfire. I quite often switch Swamp with Forest post board which is a good thing – for G1 I usually need to goldfish and post board I very often side in discard, so having more black sources becomes more relevant.
- Land Grant. It’s the reason why building a Spy deck is possible. 90% of the time you cast it for zero mana by revealing your hand, so make sure you don’t have any lands in hand! Never cut it and cast it sooner rather than later to give the opponent as little information as possible. The two main exceptions are when you play against a Spell Pierce deck and you want to have the mana to pay for it, or when you know you won’t do anything else this turn, so paying mana for Land Grant conceals information from your opponent.
- One mana landcyclers: Generous Ent, Troll of Khazad-dum and Sagu Wilding – they’re the glue that holds the manabase together. Sagu Wilding is the best of them, as it can grab either Forest or Swamp. It’s essential that these tutors are stapled to creatures, so they work with Lotleth Giant’s trigger and green draw spells. Once you tutor all the lands, they switch their role and become your plan B – big creatures that at first stabilize the board and later can take over the game if the opponent is either soft to massive bodies or ignores them for too long because they’re too focused on keeping your combo in check.
- Gatecreeper Vine. While it costs two mana, it fits into the deck nicely as it serves multiple roles. It grabs any land you want, it’s a creature for Dread Return and Lotleth Giant purposes and it has Defender, so it enables broken starts with Overgrown Battlement.
The combo
The combo package in Spy doesn’t take that many slots. Four Balustrade Spy is self-explanatory. Spy is cast on the final turn of the game around 80% of time and it either wins or loses you the game, depending if the opponent has the hate or not. Sometimes it’s okay to cast it as a 2/3 flyer and either stop the opponent’s aggression or start attacking while the opponent slows down their development because of the threat of your combo.
The two copies of Dread Return and Lotleth Giant each may need some explanation though. Duplicating both solves all the issues the deck had in the past:
- it’s still possible to combo off if you draw the first copy of a given card.
- Having access to two Dread Returns enables playing around a single piece of countermagic.
- The second reanimated Lotleth Giant usually beats any form of lifegain – you’re able to go over the top in majority of times (the known exceptions are Wellwisher + Quirion Ranger, double Lunarch Veteran + a bunch of creatures from mono White, and infinite life combo from Familiars).
- Both Dread Return and Giant are also useful outside of the combo. It’s possible to reanimate something big for four mana, or to hardcast the Giant as a solid beater.
Creature ramp
The current version of Spy combo uses the Walls engine to generate both mana and enough bodies in play for Dread Return. It’s all thanks to the power of Overgrown Battlement – it’s clearly the best mana dork in Pauper, since it can generate a lot of mana very early in the game and it’s quite hard to kill for most decks. The majority of other mana creatures in the deck earns their place mostly by having defender. There are some differences between them, for example Wall of Roots can give you two mana total per turn cycle, so you can use landcyclers on your opponent’s turn. Its ability also doesn’t require a tap, so you can use it immediately. Saruli Caretaker doesn’t do much alone, but when paired with another creature, it can generate coloured mana, which can be important when you want to cast Dread Return, Discard into Spy or flashback Flaring Pain against Prismatic Strands. I’m not the biggest fan of it, but the fact it costs one and can ramp makes it an acceptable addition to the deck.
There are also a few nondefender mana dorks that can be considered playable at least. Elves of Deep Shadow is the latest addition to the deck. It’s a simple, yet effective way to boost our mana early on, so we can get more turn three kills. It’s debatable if you need all four of them, because the drawback of losing life is significant in tempo matchups, but the upside of having more black sources for spells like Dread Return, Haunting Misery, or Spy + Mesmeric Fiend is just too good to pass up.
Quirion Ranger is the only nondefender mana dork, but it has numerous upsides. Firstly, it works beautifully with Battlement and Caretaker. In the mid game, it often acts as a mana dork by itself – when you’ve tutored all the lands, bouncing a land after it taps for mana to replay it acts similarly to Lotus Petal. It’s also good in the midrange plan because it lets you untap your big attackers to block. Despite its strengths, it doesn’t do that much by itself in goldfish situations, that’s why it’s not present in every list, and when it sees play, it tends to be as an addition to other existing mana plans, often played as two-off, but never as a full playset.
Wall of Roots versus Axebane Guardian
The Spy community isn’t sure how we should evaluate Axebane Guardian and whether it should take Wall of Roots’s place. In this deck, Guardian is a worse version of Battlement – more expensive and easier to kill, especially for Lightning Bolt decks. On the other hand, I can see it being good in some metagames. For example, if we have to switch into a fair plan in almost every game, having a potent mana dork is a key effect to deploy your heavy hitters on time. My issue with this logic is that if we expect to go into the hardcast mode all the time, Spy seems like a poor choice in the first place. And in goldfish scenarios, it’s much better to have Wall of Roots since it accelerates us faster. Our goal is not to produce fifteen mana on turn five, but to have an extra one or two for turn three, so we can secure a turn four win. My gut tells me that Wall of Roots builds should be better suited in majority of the metagames, but I also don’t mind playing Guardians instead.
Lotus Petal – why should you never skip it?
When I was streaming the deck, both the old configurations and Spy Walls, at least half of the questions were about Lotus Petal: is it worth playing? Why do I play so many copies? Isn’t it bad with the draw spells? And so on. So below you’ll find answers to every important question, so you won’t have to ask about this card ever again:
- Lotus Petal is (in my opinion) essential for any Spy deck because it increases the stability of your keeps. If you want to play a game of Magic, you need to have at least one source of mana to start. Since the deck can’t play too many lands and you can have only four Land Grants, the number or sources in your opening hand is very limited. In fact, playing only eight starting sources (or even nine if you decide to play five lands) is far too low and it would lead to many forced mulligans. If you add Petals, the number of turn one sources can go up to twelve copies which is still low, but at least it’s acceptable. Once you have the first source of mana, you can start chaining landcyclers and you should be fine.
- Lotus Petal speeds up your early turns, which is extremely important for the deck that wants to goldfish as fast as possible. The most broken openings start with Petal. For example: turn one Overgrown Battlement or Wall of Roots into Saruli Caretaker leads to up to four mana on turn two, so you can take the turn to set up and present the combo on turn three. Don’t be afraid to use Petal aggressively.
- Lotus Petal is a source of nongreen mana. It can be useful if your Swamp gets destroyed somehow or if you want to cast discard into Spy to protect your combo. It can also help you cast Dread Return since double black can be quite challenging otherwise. It’s also a great way to cast Flaring Pain.
- Many people ask about how the Lotus Petal interacts with our draw spells. The first instinct may lead to conclusions that they don’t work well with each other because Petal can’t be found by them. And while it’s true, in my opinion it’s much more important what Petal does when it’s in our hand when we cast a draw spell – it’s an extra mana that helps us cast spells after we draw a bunch of cards, so we can translate the accrued card advantage into a commanding board position faster and we won’t be forced to discard to hand size in the unlikely event of getting extremely lucky and grabbing four or five cards from our draw spell.
With that being said, there are also downsides of playing multiple Lotus Petals. The first one drawn is often phenomenal at gaining tempo or letting us keep the opening hand, but any subsequent copies can often be a dead draw because in the midgame you should be able to produce all the mana you need and you’d rather draw some action. That’s why I can see playing less than a full playset to still be able to see the first copy, but to not draw more than two. I was playing four earlier, now I’m settled on three copies and that number feels right to me.
Simian Spirit Guide – a much worse Lotus Petal
Some people were testing Simian Spirit Guide in place of Lotus Petals. The idea is simple – SSG is a creature, so it can be grabbed by green draw spells and is a fuel for Lotleth Giant. While I like the general idea, in my opinion there are too many downsides to it. The fact it gives you only red mana drastically decreases the ability to use it in the early game. You won’t be able to keep a SSG + Sagu Wilding hand. SSG won’t help you to cast Mesmeric Fiend or Balustrade Spy when your Swamp gets destroyed by Cleansing Wildfire. And unlike Lotus Petal, which can be played anytime you want and can sit on the battlefield until it’s needed, you won’t be able to exile SSG in advance, so you will still have to discard to hand size after you drew well from Lead the Stampede. While each of these situations are rather minor, when you combine them, you’ll clearly see how much worse SSG is compared to Petal. You simply would sacrifice too much for a very little gain. It would be a much different discussion with Elvish Spirit Guide but sadly, it’s not legal in Pauper.
Draw spells and green cantrips
The true power of Spy Walls (and every other green creature deck in the format) lies in the two phenomenal draw spells: Winding Way and Lead the Stampede. In first iterations of the archetype, they weren’t involved because of two reasons: there weren’t enough creatures to take full advantage of having them and they were a bit too slow without any form of ramp. Adding Walls to the combo shell solved those problems. The card advantage provided by WW and Lead enables playing as a midrange deck and overcoming hate. They also make mulligans less painful, which is even more important in a deck that often has to send back no-landers. In my opinion, the deck wouldn’t be playable without them and it’s hard for me to imagine a world when I don’t play eight copies. In fact, I would love to play a ninth card like that, but sadly they are either too expensive to be played in multiples (for example You Meet in a Tavern) or they are just cantrips. While I like the concept of making the deck more consistent, it’s quite hard to find space for cantrips because you need to have a critical mass of creatures.
Speaking of cantrips, there are a few options that at least should be mentioned here. In terms of raw power, the best one is for sure Malevolent Rumble – digs deep and lets you have a Scion that can both ramp you further, especially with Saruli Caretaker in play, and be a body for Dread Return. It also mills cards, so it fuels Masked Vandal which sometimes lacks creatures in the yard early on. The extra cards thrown into the bin also lets us play around Relic of Progenitus’s first ability. There are two problems though. First is its cost and how many other two drops we already have in the deck – in my testing sometimes it was awkward, especially in the early game. The second comes in the form of the uncontrolled selfmill. For example, if you are searching for Masked Vandal to deal with Nihil Spellbomb and you mill both Dread Returns, you won’t be able to protect them and the combo route will be closed for good. Still, it’s probably the best card available in this slot and I don’t mind playing a few copies.
There are also a few one mana options – much more appealing in terms of the mana curve and how they interact with a turn two Wall of Roots. Commune with Nature is the best one at finding creatures, but it has one huge downside – it can’t get anything else and sometimes you need a land or a draw spell. That’s why I value Elven Farsight more. While its wording can be confusing and sometimes it can actually miss, Farsight lets you draw a creature and set up a useful noncreature card on top for future turns.
Overall, you should always play eight copies of core card advantage spells and you can add a few copies of other selection spells if you really want to, but they aren’t as essential for the deck as the main ones.
Dimir House Guard – why does it look so good, but nearly always disappoints?
Dimir House Guard looks phenomenal on paper – a creature that’s also a tutor effect for a namesake card. It also could be cast and has relevant abilities while on the board! Fear helps in the midrange game and the sacrifice ability is useful when short on the creatures for Lotleth Giant. DHG was played in earlier iterations of the deck, but in my opinion, it’s close to unplayable in the Walls version. There are multiple reasons why:
- Three mana for a tutor is a lot.
- Very often, especially postboard, you don’t want to go all-in on the combo, so tutoring only for Balustrade Spy is quite narrow. Much often, it’s more appealing to cast a draw spell and get a decent chance to get Spy and something else that can support the midrange plan.
- Double black can be a challenge.
- Some players were saying that DHG could tutor for other useful cards like Snuff Out, You Meet in a Tavern, or mediocre Disenchants stapled to creatures. While it may sound appealing, in practice it’s an extremely slow engine and rarely does anything, with maybe the exception of Snuff Out against Walls or Elves, but even then it’s a very narrow case.
Interaction
Playing a one-card combo deck is a luxury. It lets us run a few interactive cards in the maindeck, as we don’t need to devote every single slot to ensure the consistency of the combo. As for any other category of cards, you usually want to play creatures over other card types, and their usefulness in game one should be as wide as possible. Against the open metagame, there are two ‘sideboard’ creatures often played in the maindeck:
- Masked Vandal. It was played in nearly every iteration of the deck, mainly because it’s the best answer to Nihil Spellbomb, which is often maindecked by various black decks. Vandal has a unique wording – it deals with a problematic permanent for just two mana and leaves the body behind for later. On top of that, it exiles the target rather than destroying it, so it can deal with indestructible artifact lands, Ichor Wellspring/Chromatic Star without letting the opponent draw a card, Myr Retriever without triggering it, etc. It comes with a cost – you have to exile a creature from a graveyard to use its ability, which can be challenging sometimes, especially with only six landcyclers in the deck. Luckily, more often than not you’ll have something to eat. In most lists, Masked Vandal is played as a four-of in the 75 with a few copies in the maindeck and the rest in the sideboard.
- Mesmeric Fiend is mainly a sideboard card that sometimes can be maindecked as well. It’s just a discard spell on legs – good against blue decks with Counterspell and in combo mirrors. It’s also a solid answer to otherwise problematic hate cards like Faerie Macabre. The biggest problem with Fiend is that against some decks it’s only a temporary solution – if the opponent plays a lot of creature removal, the card exiled with Fiend will eventually come back to them. Nowadays, it’s played as a three or four-of in the 75, and sometimes a few copies can sneak to the maindeck. Personally, I wouldn’t include like a full playset or so in the starting sixty, mostly because Lava Dart and Krark-Clan Shaman are somewhat popular and Mesmeric Fiend is terrible against those, but the first or second copy should always be quite useful, against any deck.
Other sideboard options
Swamp
While the majority of the Spy community doesn’t play a fifth land in the sideboard, in my opinion it’s an important piece of the puzzle if you expect to play a longer, midrange game. I bring it in against Cleansing Wildfire decks and in the matchups that tend to go very long, like Gates because of Prismatic Strands. The more lands in play you have, the easier it is to hardcast landcyclers and chain draw spells into creatures you’ve just found on the same turn. If you board in a lot of discard spells and your plan is to go for a discard spell into Spy, you can also swap Forest into Swamp and play a 2/2 split instead of 3/1 – just make sure to not use your Generous Ent or Land Grant without anything to find because memory muscle kicks in quite often.
Faerie Macabre
It’s the best graveyard hate available for us. It’s a creature, doesn’t require mana to be used and the decks that are soft to if – mirror, Altar Tron, Dredge, etc. – don’t have a great answer to it. The most efficient discard spell in Duress can’t take it and the rest is quite inefficient because they cost two mana. Sometimes it’s tempting to bring in a couple of Macabres against decks that use the graveyard to a smaller extent. For example, against Red Madness with the plan to exile Sneaky Snacker, Faithless Looting, and Lava Dart or to combat Prismatic Strands decks from a different way might have some merit, but it should be a nice addition, not a main gameplan against those decks.
Haunting Misery
It’s an elegant solution to all types of graveyard hate. The idea is simple – once we mill our deck with Balustrade Spy’s trigger, we’re the first player with priority, so we have a moment to cast Haunting Misery, exiling all of our milled creatures as a part of the cost and present a win condition that can’t be interrupted by Faerie Macabre, Nihil Spellbomb, Thraben Charm, Relic of Progenitus, etc. While the card looks phenomenal, at least in theory, it has a few big downsides that should be mentioned before you mindlessly add four copies to the sideboard:
- 1BB as casting cost is quite ambitious – it’s literally impossible to cast both Spy and Misery just from lands, so at least one other source of black is needed. A wise opponent will try to attack the dorks to keep you off your secondary win con.
- The card rarely does anything outside the combo turn. It’s also terrible in multiples, so drawing too many of them early can lead to nongames when you just don’t do anything and die to random stuff.
- It doesn’t deal that much damage, at least compared to double Lotleth Giant, so keep that in mind that Misery can actually lose to cards like Weather the Storm or Wellwisher.
Overall, I like the concept of the card, but playing a full playset feels quite bad to me. When I can, I try to run two of them, just to have an option to draw the card in longer games, when rushing with the combo doesn’t work and the opponent has their defences up.
Lifegain cards
Nearly every Wall Spy sideboard has a few lifegain cards. There are a lot of options available, but I feel that we can safely separate them into two groups. The first one are creatures with lifegain attached to ETB abilities: Healer of the Glade, Nylea’s Disciple, Vitu-Ghazi Inspector, etc. They work well with the deck’s gameplan, can be boarded in against more than just Burn decks (for example I could see siding a few copies against Mono White or RG Aggro), but they all have one huge downside – they don’t give that much life. And while extra three of six life can be useful against more traditional aggro decks, it’s far too little against more combo-oriented Burn strategies centred around Guttersnipe. That’s why some lists adapted to it and started playing Weather the Storm. It’s not a creature, so by definition it’s not that synergistic with our deck, but with Lotus Petals and Land Grants it’s possible to assemble a turn when you gain fifteen or more life – and while it won’t win the game by itself against Guttersnipe, it will assuredly buy more than one turn of life, which can be a difference between winning and losing. On the other hand, WtS is not a creature, and sometimes you don’t draw too many cheap spells, so it won’t give you 12+ life all the time.
To be honest with you, neither way to tackle red decks isn’t that good. They are quite narrow, sometimes they don’t do what they are supposed to do, for example during Gutterspine combo turns. I keep thinking about cutting this part of the deck entirely and focus on something else like creature removal to answer Gutterspine more effectively. If you are not adventurous enough however, stick to the lifegain plan, it has some merits. Or at least keep a few Healers of the Glade, just in case.
Noncreature discard – Pilfer and Duress
Discard covers the majority of the spell-based hate the opponents can play – it’s self-explanatory against Counterspell decks, Thraben Charm, and spell-based combos like Cycling Storm, Poison Storm, etc. It can also be boarded in against Jund if you expect them to be prepared for the matchup with cards like Crypt Incursion or Pulse of Murasa. On top of that, it’s a solid catch-all against decks that rely on good goldfish like Bogles, Tron, etc. While Duress and Pilfer have one thing in common (unlike Mesmeric Fiend, they deal with the problem for good), they also have one huge difference. Pilfer, while it costs one more mana, it can also deal with the best answer to the combo: Faerie Macabre. If you want to add more discard spells (Mesmeric Fiends should be in your 75 in most scenarios), try to predict how popular Macabre ends up being at the event you’re planning for. Personally, I often switch discard with Haunting Misery because both effects solve the biggest problem – graveyard hate played from hand in our combo turn and the secondary upsides (Misery and answering more grave hate or discard to have versatile answers against blue and combo) decide which route I take.
Undergrowth Leopard
If you are looking for a Disenchant stapled to a creature, this is the second best option after Masked Vandal. I sometimes play one or two copies if I expect to play against a lot of Nihil Spellbombs and Relic of Progenitus.
Scattershot Archer
Very narrow, but also extremely powerful. It only ever comes in against Faeries, and possibly Squadron Hawk decks, but if you really want to crush them, this is the card for you – if you slam it early, the only counterplay they can have is Bind the Monster. If they don’t have it, the game virtually ends.
Acorn Harvest
This card has one real use – it’s our way to decrease the impact of Krark-Clan Shaman, which is the most played sweeper in Pauper. Without Harvest, games against Shaman have a very similar pattern: you have a few creatures on board and cast Balustrade Spy targeting yourself. In response to the mill trigger, the opponent wipes all nonflying creatures (remember that Spy files, so does Sagu Wilding) and you are unable to cast Dread Return because you most likely have only Spy on board and nothing else. But if you add Harvest to the mix, there’s a new line available: before you cast Spy, keep at least two extra mana in the mana pool. Once you go for the combo and the opponent wipes your ground creatures, you mill your deck. The priority goes to you, so you can flashback Acorn Harvest. If it resolves, the priority will once again go to you, so you’ll be able to cast Dread Return safely.
This line of play can also be used against other board wipes like Crypt Rats, but they would also require us to cast a third creature from hand because we’ll lose the Spy in the process. It’s much harder to achieve, but still doable.
Flaring Pain
Sometimes it’s good to add Flaring Pain to the sideboard if you expect to play against a lot of decks with Prismatic Strands (Caw Gates, Mono White, etc.). Stands stop Lotleth Giant’s trigger, so without Flaring Pain we are not able to combo out. We can either play a long midrange game and slowly but surely grind through all the Stands and chump blockers or we can just have one Flaring Pain and win one the spot. The biggest challenge is to produce red mana – you can get it from Lotus Petals or Saruli Caretaker. Personally, I only play it as a metacall if I expect to see a lot of Strands.
Creature removal
While Spy Walls is a combo deck focused on its own plan, sometimes it’s worth adding a few removal spells to keep opposing threats in check. I usually reserve up to three slots for them in my sideboard, and I tend to mix them to cover the expected meta the best. Here’s the list of playable options:
- Gut Shot. Good vs Elves, Faeries, and to some extent against other Mesmeric Fiend decks.
- Snuff Out. Good vs Elves, Walls, Familiars, and Jund. Ok against Terror.
- Disfigure. Probably the most efficient answer to Guttersnipe, while also being acceptable against Elves, Rally Red, and Faeries.
- Cast Out. The safest option, it’s never truly bad, just clunky sometimes because of its high mana cost.
- Fang Dragon. If you really want to beat Elves, this is the card for you.
Gameplay
While for the majority of the Pauper players consider Spy Walls as a very straightforward combo deck, the more experienced players will quickly realise that there’s much more depth in it. While most games will finish with Spy into Dread Return + Lotleth Giant, some will be influenced by the midrange aspect of the deck. I’ll try to analyse what these two playstyles – combo and midrange – have in common and what separates them from each other.
Similarities between two playstyles
Both combo and midrange gameplans have a very similar early game – your goal is to tutor your lands and cast enough ramp creatures to support your future plays better. Because of that it’s quite easy to keep or mulligan hands: all you need is a mana source to start, one or two tutors, some creature ramp, and Spy or spells to draw into it. The decision to go for either combo or midrange route will come later in the game, once you know the matchup, potential counterplay to the combo the opponent could have and most importantly your draws.
Combo draws
If you know you have to execute the combo as fast as possible, these are the guidelines for you:
- Think about the main objectives you need to achieve: tutor your lands, find and cast Spy, have enough creatures to flashback Dread Return.
- If your goal is to fulfill said objectives, maximise the efficiency of what you need to do. For example, if you are looking for Spy, Malevolent Rumble will most often be better than Lead because it’s cheaper. Card advantage isn’t as important.
- Once you start comboing, there’s no coming back. Before you go for it, make sure you have everything you need to win, especially the number of Dread Returns in the library and if you’ll have enough creatures in the graveyard for the Giant to win.
- If you don’t have to, don’t play Winding Way before Spy. There’s a nonzero chance you’ll flip double Lotleth Giant and be forced to put them to the hand.
- You can mulligan a bit more aggressively. For example, two lands and only draw spells will most likely be too slow against something like Elves or the mirror, because you won’t be able to deploy your creatures on time.
- If you want to play around Counterspell or lifegain, make sure you’ll have six creatures to flashback both Dread Returns.
Comboing with one land left in the deck
Sometimes you’ll be forced, or have the luxury of trying to combo with a single land left in the deck. There are many reasons to do so. A few examples:
- You are dead next turn and it’s better to try than do to nothing;
- You are ahead on board and have another Spy in hand, so the first Spy cast acts as a ‘land tutor’ that has some odds of winning the game on the spot;
- The opponent has spell-based hate like Cremate or Pulse of Murasa and is tapped out, so it’s worth trying to win.
The odds aren’t on your side. To succeed, you need to find at least one Dread Return, one Lotleth Giant and enough creatures to make Giant lethal before you flip the land. If you are good at math, my friend BigBossAardos created a special formula for you, so you can calculate the odds of winning with one land in the deck:
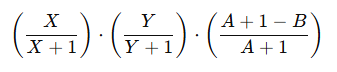
Where:
- X is the number of Dread Returns in the deck
- Y is the number of Giants in the deck
- A is the number of creatures in the deck
- B is the number of creatures you need in the graveyard to win (note that Dread Return will give you two more bodies because you’ll reanimate one creature, but sacrifice three)
So in practice, if you haven’t drawn any Dread Returns or Lotleth Giants, your opponent is at 20 life, and you have let’s say 30 creatures left in the library, the numbers would look like this:
The result is 52/279, which amounts to about 18,64%.
The double Spy line
There’s a second line that uses two Spies chained one after another. It’s quite simple – if you have at least four creatures in play before you cast a Spy, you can mill yourself, try to flip Dread Return and one of the three remaining Spies before your last land in the deck, cast Dread Return targeting Spy, mill the rest of the deck and flashback the second Dread Return targeting Lotleth Giant.
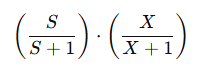
Where:
- S is the number of Balustrade Spies in the deck
- X is the number of Dread Returns in the deck
In practice, when you have three Spies and two Dread Returns in the deck, it’s ⅔ * ¾ = 50% to go off, so it will succeed somewhat often. This combo route isn’t widely used, but it’s good to know it’s there.
Midrange draws
- Midrange is a secondary plan when you either don’t draw Spy or there’s something that stops you from the combo kill, like graveyard hate, countermagic or a sweeper.
- The centrepiece of the midrange plan are landcyclers: Generous Ent, Troll of Khazad-dum and Sagu Wilding, as well as Lotleth Giant. Your goal is to hardcast as many of them and attack while you keep the ground locked up with Walls.
- Balustrade Spy sometimes joins the forces as a 2/3 flyer. If that’s the case, remember to target the opponent with its trigger!
- To successfully execute this gameplan, you need to resolve multiple draw spells. In contemporary Pauper, one Generous Ent will rarely be enough against anything, so you’ll need more heavy hitters and because only a small fraction of your cards can actually end the game in combat, the card advantage is needed to find enough beaters to overpower opposing removal.
- Overgrown Battlement is a key to developing everything on time – if you have one in play, it lets you cast a draw spell into a large monster. With two of them on board, or with Quirion Ranger involved, you can truly go wild.
- An early Dread Return targeting a landcycler is a great way to get the momentum and to take the initiative in the game. If you have the reanimation spell in hand, prioritize having at least one landcycler in the graveyard to have this line available.
- You can quite often start with the midrange plan, and pivot into combo again. Just pressure the opponent to the point when they have to tap out in combat to not die, which opens up the combo line again, so you can instantly finish the game in the second main phase.
Mulligan decisions
A few guidelines:
- Never keep a hand without a way to start the land chain. So you’ll need either a land, Land Grant, or Lotus Petal and a tutor (I’ll just call them ‘lands’ moving forward)
- The ability to get two lands on turn two is super important and if you have only one land drop secured with a bunch of two drops in hand, you should probably mulligan.
- As per usual, there are exceptions to this rule. For example, a one lander with Lotus Petal and Overgrown Battlement will give you two mana. If you have Winding Way or another Battlement and an otherwise good hand, I can see it as a reasonable draw.
- Keeping only lands and ramp without Spy or a draw spell can be quite risky, but it’s usually a keep because it opens you up for a lot of good topdecks. In these scenarios, try to look for Overgrown Battlement and don’t use landcyclers if you don’t have to – there’s always a chance to draw a Land Grant from the top, so it’s better to end up with a spare Generous Ent than a useless tutor instead.
- The second Balustrade Spy can be good against Counterspells or discard, but the third one is usually a dead draw. Some exceptions would be casting multiple Spies targeting the opponent to play around Krark-Clan Shaman’s ability or if flying blockers are good against the opposing deck (for example while versing Faeries).
- One Lotleth Giant/Dread Return in hand isn’t the end of the world. Having both copies of one of them is a forced mulligan though.
Tips and tricks you must know
- It’s quite easy to trigger Lotleth Giant twice – just flashback two Dread Returns. It’s even possible to trigger Giant three times! Just play Dread Return from hand or hardcast Giant to trigger it for the first time, then flashback the first Dread Return sacrificing a Giant and target the second Giant. Finally, cast a second Dread Return targeting the Giant that’s in your graveyard. It should beat any noninfinite lifegain.
- Dread Return from hand can help you overpower countermagic. Getting to triple black can be a challenge sometimes, but the ability to basically recast a Spy that just got countered is extremely powerful.
- Lotleth Giant from hand on the combo turn is a great way to play around some hate cards like Faerie Macabre or Pulse of Murasa. If you play a longer game against the opponent that can have these cards and you already have an Overgrown Battlement or two in play, it’s possible to produce eleven mana to win without the use of Dread Return.
- Winding Way and Malevolent Rumble can mill your lands. Sometimes it can be a good thing – if you have enough mana from ramp creatures or Lotus Petals, milling it will mean that you’ll be able to combo off faster.
- Similarly with Lead the Stampede: it puts all the noncreature cards to the bottom in any order. If you have only one land left in the deck and you put it on the bottom with Lead, you can just cast Spy and effectively mill the deck without tutoring the last land from the deck.
- You are obligated to grab all the creatures revealed from Winding Way, but you can refuse to grab the ones you don’t want to when you see them from Lead the Stampede.
- Overgrown Battlement’s power comes from scaling with the number of defenders you control. In practice, if you control one Battlement, your Saruli Caretakers effectively cost zero mana, so does Wall of Roots if you count its mana ability. With the second Battlement or Quirion Ranger in play, you can even net mana by playing defenders!
- You can fail to find a land. It’s important in the mirror when you want to increase your creature and defender count by playing Gatecreeper Vine, but you don’t want to find your last land in the deck to not get milled by the opposing Balustrade Spy.
- Wall of Roots can produce mana both on your and the opponent’s turn. It can be quite useful in racing situations when you can use a landcycler at the end of the opponent’s turn and win seemingly out of nowhere.
- Wall of Roots can stop lifelink for a turn if it’s an 0/1 if you use its mana ability after blocking. It’s mostly important against Caw Gates with Sacred Cat + Basilisk Gate.
- Wall can also sacrifice itself, although it does so really slowly, so it can become a fuel for Masked Vandal or increase the damage from Lotleth Giant.
- Quirion Ranger can protect your Forest from land destruction.
- Remember that Masked Vandal is a Shapeshifter and has all creature types, which can lead to some niche interactions. For example, it will make the opponent’s Priest of Titania better or won’t be damaged by Fiery Cannonade or Breath Weapon.

